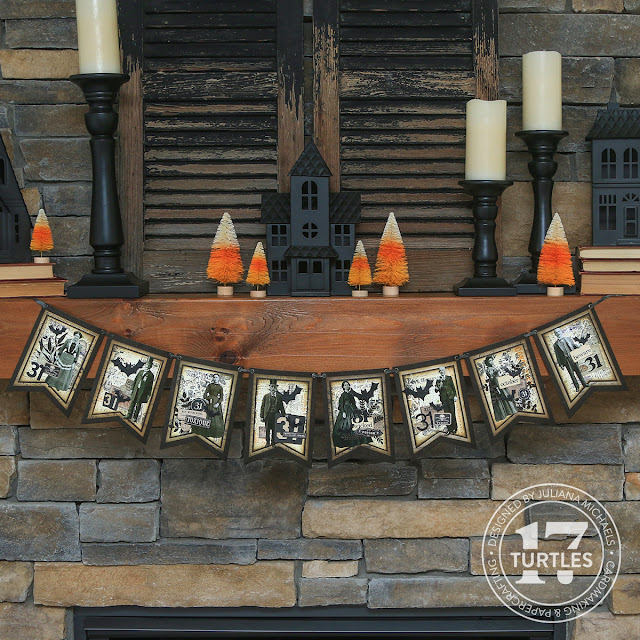
Hello friends and welcome! Today is the day. I'm finally sharing the Halloween Banner I promised last week. I have a good reason for keeping you in suspense though because this project is part of the Scrapbook.com Bat Parade! At the end of the post, I have all the details about the Bat Parade.
HALLOWEEN BANNER 2022
I'm going to walk you through the basics of how I created one of the banner pieces. I then repeated this formula for the remaining banners, just mixing it up with the embellishments and die cuts I added to made each piece unique.
To get started, I began by die cutting a piece of Tim Holtz Black Kraftstock using the second from the largest Scrapbook.com Nested Flag Banner Dies.
Using the next size down, I die cut a piece of Tim Holtz Halloween Backdrop Patterned papers, inked the edges with Walnut Distress Ink and adhered it to center of the Black Banner.
I then took the next size down and die cut a piece of Distress Mixed Media Heavystock. Using an assortment of Tim Holtz Halloween stamps and Archival Ink in Black Soot, Peeled Paint, Villainous Potion and Spiced Marmalade I created my own "patterned paper". You could easily use Distress Ink or Distress Oxide Ink if you prefer. I also made each panel different by using different stamps on each one, but if you want to hurry along the process, you could make each one the same. Once the stamping was completed, I inked the edges with Walnut Stain Distress Ink.
Next, I die cut a piece of Distress White Heavystock using the Tim Holtz Spider Web Die, inked it very very lightly with Antique Linen and Pumice Stone Distress Ink and adhered it to the stamped panel with Distress Collage Medium.
At this point, I adhered this panel to a piece of Black Kraftstock and trimmed to 3.5 inches wide and then used my scissors to cut the notch and create a thin mat layer for the stamped piece.
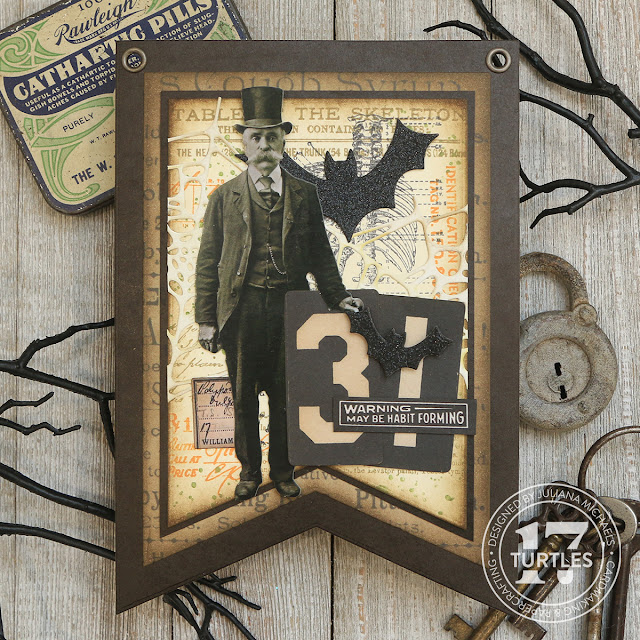
With the background completed, it's time to move onto the the embellishing. I selected a Tim Holtz Halloween Paper Doll for each banner and adhered it using double sided foam adhesive to give it a little dimension. I then added bits of Tim Holtz Halloween Ephemera and Snippets. I also die cut the letters 31 from black glitter cardstock using a mix of number dies from Scrapbook.com. To add a touch of spooky, I die cut Black Kraftstock using the Scrapbook.com Delicate Leaves die and tucked them in here and there. Who knew these gorgeous leaves could be spooky?! These dies are in the coming soon section, so make sure to hit the "notify me" button so you are in the know for when they are in stock and available!
The final touch was the addition of the bats! I die cut them from black glitter paper using the Scrapbook.com Halloween Bats Dies and adhered them with double sided foam adhesive to give them some dimension.
Next, I punched a hole in the top right and left hand corners of each banner piece using the We R Memory Keepers Crop-A-Dile to punch the hole and adhere the eyelets. I then cut a length of Hug Snug Seam Binding, inked it with Black Soot Distress Spray Stain, dried it and thread it through the eyelets so I could hang my banner.
Here is a look at each of the individual banner panels as well as a close up detail image of each one. Enjoy the scroll!
This is a look at my Halloween Banner hanging on my mantel.
I hope you enjoyed learning how my Halloween Banner 2022 came together and that it will be the first of many I create to share with you. Speaking of making. Have you ever made a Halloween Banner?
SCRAPBOOK.COM BAT PARADE
What is the Bat Parade you ask?! Well let me tell you. Today Scrapbook.com is having a Livestream deal that features their Halloween Bats Die Set. This deal will only last for two days or while supplies last, so make sure you head over to their Livestream to check it out if you haven't already.
To celebrate this deal, a group of talented crafters will be sharing loads of inspiration on how they've used this die set to create everything from cards, to scrapbook pages, home decor and more! You can look for them on Instagram using the hashtag #batparade or in the Bats Parade Gallery on Scrapbook.com.
HALLOWEEN BATS DIES
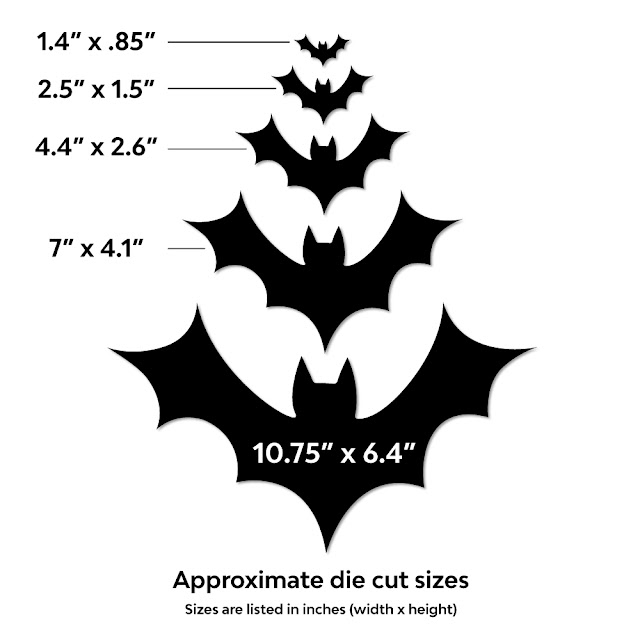
This die set includes 5 dies in the following sizes, making it perfect for all of your paper crafting needs!
SUPPLIES
Below you can find the products I used to create this project along with compensated affiliate links to Scrapbook.com. These links are at absolutely no cost to you. When you shop through the links below, I receive a small commission from Scrapbook.com. These links are at absolutely no cost to you and the commission I receive helps me cover the costs of my blog and other expenses, which allows me to continue to provide you with FREE inspiration and tutorials. If you want to learn more about what an affiliate link is, you can see my full affiliate and product disclosure statement here. Thank you so much for your love and support!* This is not an affiliate link, but one of the few places I've been able to locate the seam binding I used:


This is so, so good! I let out a squeal when I seen it! Bravo!
ReplyDeleteLove it, thanks for sharing your how tos and all the pics. No, I have never made a Halloween Banner, maybe this is the year I make one.
ReplyDelete