Die Cut Stenciled Ombre Background | Newton's Nook Designs

Hi and hello friends! Today, I'm excited to share a Happy Valentine's Day card with a Die Cut Stenciled Ombre Background using some lovely new products from Newton's Nook Designs! Their recent January release included a new set featuring Newton called Newton's Sweetheart Stamp Set and a fun new stencil called Tumbling Hearts. I'm using both of those along with a couple of other products to create the card I'm sharing with you today.

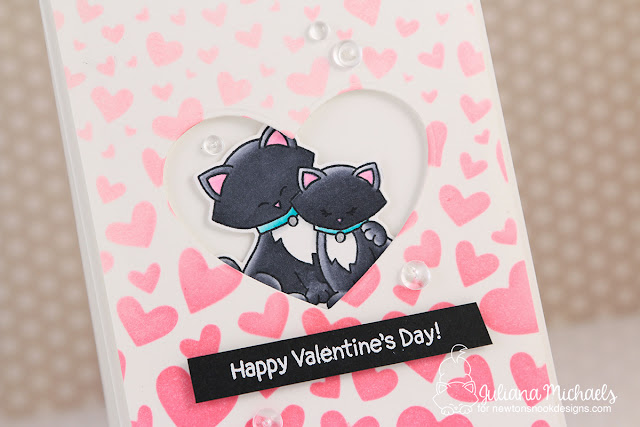
Happy Valentine's Day Card with Distress Oxide Die Cut Stenciled Ombre Background by Juliana Michaels featuring Newton's Nook Designs Newton's Sweetheart Stamp Art and Tumbling Hearts Stencils

[All supplies are linked in the text below. Compensated affiliate links used at no cost to you.]


Die Cut Stenciled Ombre Background


To get started, take a piece of white cardstock and center the heart die from the Darling Hearts Die Set. Use low tack tape to hold it in place and run it through your die cut machine. You might notice the fun purple colored tape I'm using here. It's a brand new product from Therm O Web called Purple Tape and it's it perfect for holding your dies in place from this sort of technique. The tape is repositionable and doesn't tear your paper when you remove it.


After the die cutting is complete, take the same tape and position the Tumbling Hearts Stencil on top of the cardstock. Ink blend it using Distress Ink or Distress Oxide and a blending tool. To achieve the Ombre look, begin by applying the ink at the bottom of the card and work your way up. This way more ink will be applied at the bottom and the ink color with fade as you progress toward the top.


Remove the stencil and your background is ready to use. For this card, I started with a 4.25 x 5.5 inch piece of cardstock. I then trimmed it down to 4 x 5.25 inches.


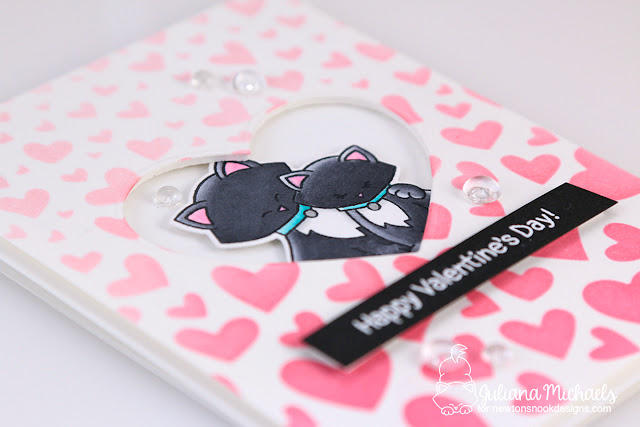
I wanted to give the die cut stenciled panel some depth when I attached it to the card front. To do this, place the heart die on a piece of craft foam and run it through your die cut machine. Trim the foam to just smaller than the card front and adhere it to the back side of the card front.


Adhere the panel to the card base. Stamp, color and die cut one of the adorable Newton's Sweetheart images and tuck it behind the die cut heart opening. Use a bit of double sided foam adhesive to adhere the image inside the opening for even more depth and dimension.

Happy Valentine's Day Card with Distress Oxide Die Cut Stenciled Ombre Background by Juliana Michaels featuring Newton's Nook Designs Newton's Sweetheart Stamp Art and Tumbling Hearts Stencils

Stamp the sentiment from the Love Bites Stamp Set onto black cardstock using Versmark Embossing Ink and then heat emboss it with white embossing powder. Trim to size and then adhere it to the card front, again popping it up with some double sided foam adhesive. For the final touch add some clear gems or sequins.

Happy Valentine's Day Card with Distress Oxide Die Cut Stenciled Ombre Background by Juliana Michaels featuring Newton's Nook Designs Newton's Sweetheart Stamp Art and Tumbling Hearts Stencils

Supplies


Here are the supplies I used on the card I created and shared with you. Affiliate links have been used to Simon Says Stamp. Thank you so much for your support!


Newton's Nook Designs January Release Day 4 | Newton's Sweetheart

Welcome to Day 4 of the Newton's Nook Designs January Release! With today being the final day, we are of course revealing the newest Newton stamp set...Newton's Sweetheart! Newton has a girlfriend!

Valentine Shaker Card | Newton's Sweetheart Stamp Set


I couldn't resist creating at least one shaker card for this month's release. I mean it is Valentine's theme and I just HAD to use some of my heart sequins/confetti! And this adorable Newton's Sweetheart stamp set was purrfect for creating a shaker card.

Valentine's Day Shaker Card by Juliana Michaels featuring Newton's Nook Designs Newton's Sweetheart Stamp Set

To create the shaker box frame use the 2 largest frame dies from the Frames & Flags Die Set. Line them up and use tape to hold them in place.

Shaker Card Tutorial by Juliana Michaels featuring Newton's Nook Designs

Place them on the Double Sided Foam Adhesive and run it through your die cutting machine. Also use this to die cut another frame from white cardstock to adhere on the outside of the shaker box, once you are finished with creating the shaker box. Set the die cut cardstock piece to the side to be used later.

Next, trim an Acetate Sheet to the size of the frame. I recommend cutting a rectangle rather than trying to die cut it with the scallop frame die. I found a rectangle to be much easier to line up when adhering it to the foam.  To adhere the acetate to the foam, simply peel off the adhesive on one side.

Shaker Card Tutorial by Juliana Michaels featuring Newton's Nook Designs

Now it's time to work on the inside of the shaker. Die cut a piece of white cardstock using the large scallop frame from the Frames & Flags Die Set. Dry Emboss the cardstock using the brand new Tumbling Hearts Stencil.

Ink blend the embossed cardstock to make the design stand out even more. I used Distress Oxide in Picked Raspberry.

Shaker Card Tutorial by Juliana Michaels featuring Newton's Nook Designs

Next, die cut a piece of white cardstock using the hill die from the Land Borders Die Set. Place the the sentiment piece, stamped/die cut image and die cut hill behind the shaker frame to determine where you want everything to be positioned everything before you glue it down.


Use the scalloped frame to die cut the hill so it will layer perfectly on the background.

Shaker Card Tutorial by Juliana Michaels featuring Newton's Nook Designs

To complete the background, use your favorite adhesive to glue everything in place.

Shaker Card Tutorial by Juliana Michaels featuring Newton's Nook Designs

To complete the shaker card, grab all your fun sequins and confetti and pour them in the center of the background. Peel off the back liner on the adhesive foam frame and adhere it on top of the background.

Shaker Card Tutorial by Juliana Michaels featuring Newton's Nook Designs

Now, grab that die cut cardstock frame that you created earlier and adhere it to the front of the shaker box. Glue the entire box to a piece of colored cardstock or card base of your choosing. Your shaker card is now complete!!!


Blog Hop Details & Giveaway


Would you like to win the “Newton's Sweetheart” Stamp Set? This stamp set will be given away to ONE lucky winner! If you said yes, all you have to do is comment on the Newton's Nook blog and Design Team blogs (see list below)! The winner will be chosen at random from the collective reveal posts. Make sure to check out each of their blogs and comment for your chance to win. You will not know which blog has been chosen so the more you comment on the better your chances are of winning! You have until Thursday January 18th at 9pm EST to comment -- winners will be announced on the Newton's Nook blog on Friday, January 19th.
Now, let's get hopping and check out all the awesome Design Team Blogs below to enter:


Supplies


Are you interested in the Newton's Nook Designs products I used to create my cards? These are the new stamps and dies I used to create the above cards and they will be available to purchase Friday, January 19th!

Newton's Nook Designs Newton's Sweetheart Stamp Set


Newton's Nook Designs Newton's Sweetheart Die Set


Newton's Nook Designs Tumbling Hearts Stencil


Newton's Nook Designs January Release Day 3 | Deer Friend

Hello Friends! It's Day 3 of the Newton's Nook Designs January Release! Today I'm sharing more Valentine card inspiration using the new Deer Friend stamp and die set.

Fawned Of You Valentine Card | Deer Friend Stamp Set


Seriously, could these little deer be any cuter?! I began by stamping the images and coloring them with my Chameleon Pens. I then die cut the deer using the coordinating dies.

Fawned Of You Valentine Card by Juliana Michaels featuring Deer Friend Stamp Set

The sentiment is stamped on a heart that was die cut using the Darling Hearts Die Set. I then colored it using Distress Oxide in Picked Raspberry. I then added a couple of stamped and die cut hearts. To pop up the hearts and the one deer, I used double sided foam adhesive.

Fawned Of You Valentine Card by Juliana Michaels featuring Deer Friend Stamp Set

I created the grass border using the Land Borders Die Set and layered it on top of one of the frames from the Frames & Flags Die Set. So that it would all layer nicely, after die cutting the grass, I placed the frame die over it and die cut it again. As you can see, I used tape to help hold the die in position so it wouldn't accidentally slide when I ran it through my die cut machine.


The white frame behind everything was dry embossed using the new Tumbling Hearts Die. I'm rather bummed that I couldn't get it to show up in my photos, but I do promise that in real life it looks awesome and adds a wonderful touch of texture to the card.

I finished off the card with a kraft colored frame die cut using the scallop frame from the Frames & Flags die set.

Fawned Of You Valentine Card by Juliana Michaels featuring Deer Friend Stamp Set


Blog Hop Details & Giveaway


Would you like to win the “Deer Friend” Stamp Set? This stamp set will be given away to ONE lucky winner! If you said yes, all you have to do is comment on the Newton's Nook blog and Design Team blogs (see list below)! The winner will be chosen at random from the collective reveal posts. Make sure to check out each of their blogs and comment for your chance to win. You will not know which blog has been chosen so the more you comment on the better your chances are of winning! You have until Thursday January 18th at 9pm EST to comment -- winners will be announced on the Newton's Nook blog on Friday, January 19th.

Now, let's get hopping and check out all the awesome Design Team Blogs below to enter:


Supplies


Are you interested in the Newton's Nook Designs products I used to create my cards? These are the new stamps and dies I used to create the above cards and they will be available to purchase Friday, January 19th!

Newton's Nook Designs Deer Friend Stamp Set


Newton's Nook Designs Deer Friend Die Set


Newton's Nook Designs January Release Day 2 | Sending Hugs

Hello friends! I'm so excited that you're joining me for Day 2 of Newton's Nook Designs January Release! Today, I'm sharing a Birthday Wishes Card I created using the brand new Sending Hugs stamp and die set.

Birthday Wishes Card | Sending Hugs Stamp Set


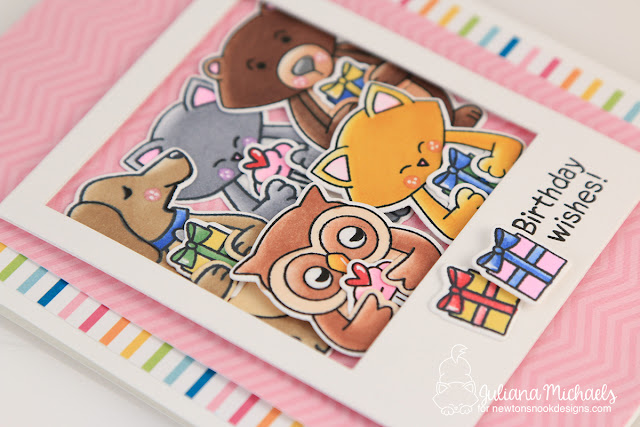
I couldn't resist stamping, coloring and die cutting the entire crew to help celebrate this special day. I love that each critter has a die that cuts it's arms so that it can hold a variety of objects ranging from a cupcake to a teddy bear! I knew I wanted to make a birthday card, so I went with some cupcakes and presents.

Birthday Wishes Card by Juliana Michaels featuring Newton's Nook Designs Sending Hugs Stamp Set

I've recently been cleaning and purging my craft room and during this process I came across some die cut picture frames I had cut and put to the side for some unknown future project.  As soon as I saw them, I immediately thought it would be so fun to place all the critters inside the frame.

Birthday Wishes Card by Juliana Michaels featuring Newton's Nook Designs Sending Hugs Stamp Set

With that idea in mind, I stamped the sentiment on the base of the frame and added a couple of presents. Once all the stamping, color and die cutting was complete, I arranged the crew behind the die cut picture frame.

Birthday Wishes Card by Juliana Michaels featuring Newton's Nook Designs Sending Hugs Stamp Set

I used double sided foam adhesive to attach the frame piece to the card front. I adhered the adhesive all around the back side of the frame. I then placed a piece of it behind the each of the two critters in the very front to add bit more depth to the design.

Birthday Wishes Card by Juliana Michaels featuring Newton's Nook Designs Sending Hugs Stamp Set

Blog Hop Details & Giveaway


Would you like to win the “Sending Hugs” Stamp Set? This stamp set will be given away to ONE lucky winner! If you said yes, all you have to do is comment on the Newton's Nook blog and Design Team blogs (see list below)! The winner will be chosen at random from the collective reveal posts. Make sure to check out each of their blogs and comment for your chance to win. You will not know which blog has been chosen so the more you comment on the better your chances are of winning! You have until Thursday January 18th at 9pm EST to comment -- winners will be announced on the Newton's Nook blog on Friday, January 19th.
Now, let's get hopping and check out all the awesome Design Team Blogs below to enter:


Supplies


Are you interested in the Newton's Nook Designs products I used to create my cards? These are the new stamps and dies I used to create the above cards and they will be available to purchase Friday, January 19th!

Newton's Nook Designs Sending Hugs Stamp Set


Newton's Nook Designs Sending Hugs Die Set

Newton's Nook Designs January Release Day 1 | Love Bites

Hello friends and welcome to Day 1 of Newton's Nook Designs January Release! I'm so thrilled to be back for another term with Newton's Nook and to be able to continue to share more inspiration with you using their adorable products! Today we are share an adorable new stamp and die set called Love Bites AND a new stencil called Tumbling Hearts. I've used both of these new products to create a trio of Mini Valentine Cards.

Mini Valentine Cards | Love Bites Stamp Set


Mini Valentine Cards by Juliana Michaels featuring Newton's Nook Designs Love Bites Stamp Set and Tumbling Hearts Stencil

Each of these cards is 4x4 inches. To get started, I cut a piece of white cardstock to 3.75 x 3.75 inches. I then used the Tumbling Hearts Stencil with my Spellbinders Platinum 6 to dry emboss the design right into the cardstock. This has to be one of my favorite ways to use stencils!


I then used a mix of different Distress Oxide Inks to add color to each of the squares before adding them to my card fronts. This photo shows a panel made using reds. However,  during the final process of putting these cards together I decided to leave out the red and go with pink, blue and purple.


On this Olive You Valentine I used Wilted Violet Distress Oxide. All of the images are stamped with Memento Ink and then colored with Chameleon Pens.

Olive You Mini Valentine Card by Juliana Michaels featuring Newton's Nook Designs Love Bites Stamp Set and Tumbling Hearts Stencil

I used Picked Raspberry Distress Oxide to color the background on the Soda Like You Valentine.

Soda Like You Mini Valentine Card by Juliana Michaels featuring Newton's Nook Designs Love Bites Stamp Set and Tumbling Hearts Stencil

On this Muffin Without You Valentine, I used Salty Ocean Distress Oxide to color the background.

Muffin You Mini Valentine Card by Juliana Michaels featuring Newton's Nook Designs Love Bites Stamp Set and Tumbling Hearts Stencil

Now that you've seen a little inspiration, let's get on with the blog hop!


Blog Hop Details & Giveaway


Would you like to win the “Love Bites” Stamp Set? This stamp set will be given away to ONE lucky winner! If you said yes, all you have to do is comment on the Newton's Nook blog and Design Team blogs (see list below)! The winner will be chosen at random from the collective reveal posts. Make sure to check out each of their blogs and comment for your chance to win. You will not know which blog has been chosen so the more you comment on the better your chances are of winning! You have until Thursday January 18th at 9pm EST to comment -- winners will be announced on the Newton's Nook blog on Friday, January 19th.

Now, let's get hopping and check out all the awesome Design Team Blogs below to enter:

Newton's Nook Designs
Holly Endress
Ellen Haxelmans
Larissa Heskett
Samantha Mann
Juliana Michaels
Naki Rager
Maria Russell
Jennifer Timko
Tatiana Trafimovich

Supplies


Are you interested in the Newton's Nook Designs products I used to create my cards? These are the new stamps and dies I used to create the above cards and they will be available to purchase Friday, January 19th!

Newton's Nook Designs Love Bites Stamp Set


Newton's Nook Designs Love Bites Die Set


Newton's Nook Designs Tumbling Hearts Stencil

Subscribe