Hill Landscape Pop Up Card Tutorial
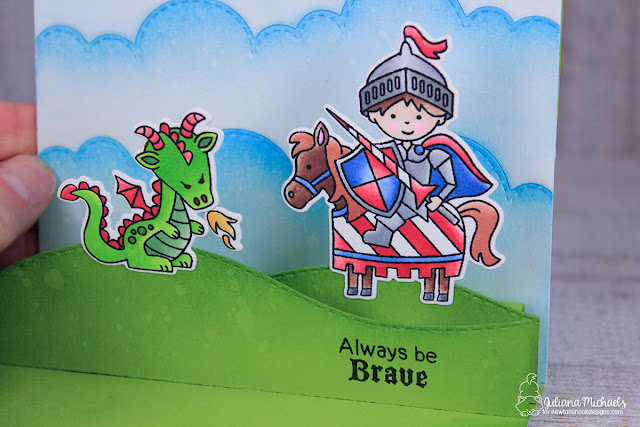
At first glance, this card might seem a little simple, however once you open the card the fun begins!I used the Sky and Land Border Dies to create the scene on the front of the card. I then used these same dies to create the pop up scene on the inside.
To create your own pop up scene, begin with a piece of green cardstock cut to 4.25 x 5.5 inches. Cut this in half using the hill die.
Take one of the die cut pieces and offset it with the first piece so that you have two hills.
Trim off the excess piece on the left side of the second piece to create the hill in the background. Don't throw away that scrap. You are going to use it in a few!
Score the first hill piece at 1 inch.
Score the second hill piece at 1 inch.
After scoring the second hill, trim off 1/2 inch from the bottom.
Take that scrap that I told you not to throw away from the second hill and trim it into (3) 1/2 inch strips. Cut one strip to 2 inches long. Cut the other two strips to 1.5 inches.
Score the 2 inch strip at 1/2 inch and 1.5 inches.
Score the 1.5 inch strips at 1/2 and 1 inch.
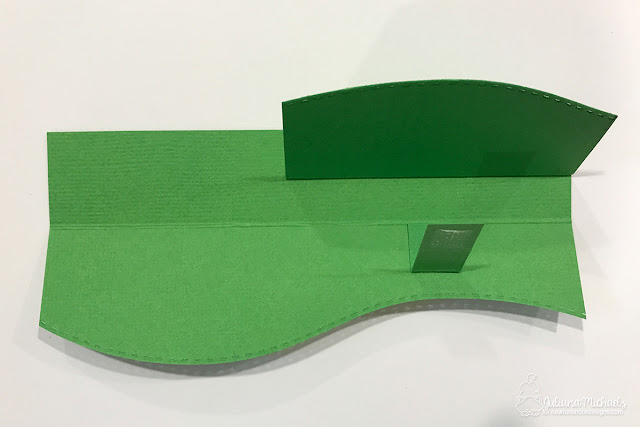
Adhere the two hills together, making sure to line them up as indicated in the image below.
Fold back the second hill and attach one of the 1.5 inch strips as per the photo below.
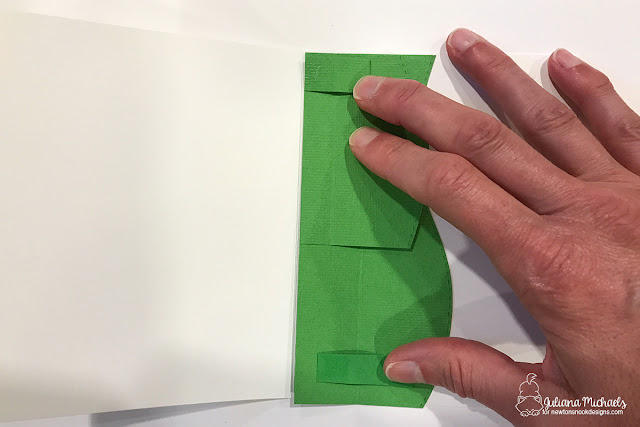
Fold the second hill flat and attach the other 1.5 inch strip as shown in the photo.
Adhere the 2 inch strip as per the image below.
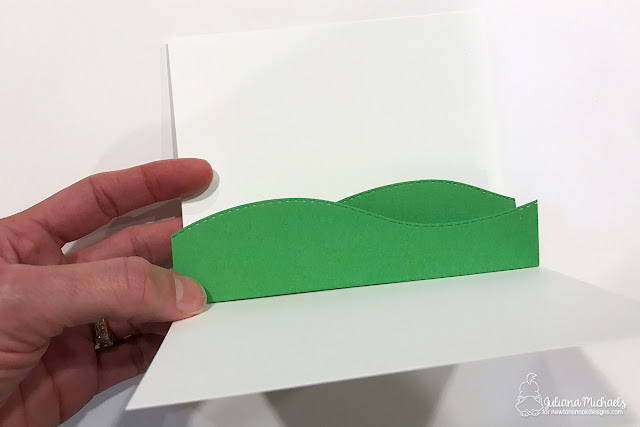
Place the piece inside a folded card base. Apply adhesive along the bottom fold on the first hill and adhere this to the card base. Make sure it is pushed all the way into the fold of the card.
Fold the tabs flat as per the photo below, add adhesive to the tabs and close the card.
When you open the card, your hill landscape pop up is complete. Now it's time to decorate it with your favorite critters or people to build your scene!
If you want to stamp a sentiment on the hill, make sure to do that before you attach it to the inside of your card. Don't ask who, but I might know someone who didn't do that the first time and it is much easier to do the stamping first!
I hope you enjoyed learning how to create your own Hill Landscape Pop Up Card Tutorial!
Blog Hop + Giveaway
Are you ready for the fun stuff? Here are all the blog hop and giveaway details. So, how would you like to win a the Knight's Quest Stamp Set?
For your chance to win, all you have to do is leave a comment on the Newton's Nook Design Blog and each of the Design team Members blogs. You have until Thursday August 17th at 9pm CST to comment and the winners will be announced on the Newton's Nook blog on Friday, August 18th.
Newton's Nook Designs
Amanda Bodine
Holly Endress
Ellen Haxelmans
Larissa Heskett
Samantha Mann
Juliana Michaels
Naki Rager
Maria Russell
Jennifer Timko
Tatiana Trafimovich
Supplies
Are you interested in the supplies I used to create these cards? To make them easy for you to find, I've listed them below. Affiliate links are used at no additional cost to you and I've linked to them because I use them and love them! Click on the image below each picture to go to your favorite store.






Love the vibrant use of colour xx! (alilovescardmaking)
ReplyDeleteamazing card!
ReplyDeleteGreat pop-up card!
ReplyDeleteWhat an awesome card! Thank you so much for the tutorial; will definitely have to give this a go!
ReplyDeleteYou did an excellent job taking all the tutorial photos and explaining your card. GOOD job...such a CUTE card! I have finally found my prince in shining armor. ;)
ReplyDeleteThank you for sharing your tutorial for the pop up card, I love the way you made this! I love everything about it!
ReplyDeleteI adore your pop up card, thank you for the tutorial.
ReplyDeleteGreat tutorial with clear steps that make it easy to follow. I adore that little angry dragon---he's too cute to be mean!
ReplyDeleteso creative! thanks for sharing :)
ReplyDeleteSuper cool pop-up card. Thanks for the inspiration
ReplyDeleteLove how this scene pops up!
ReplyDeleteAbsolutely fun, thanks for the tutorial!
ReplyDeleteFAB design!
ReplyDeleteWhat a fabulous and cute popup card!! Awesome job.
ReplyDeleteWhat a fun interactive card and thank you for the great step by step tutorial. So helpful.
ReplyDeleteFAB!!! I just ordered cloud and landscape dies, so I can't wait to refer back to this great tutorial when they arrive. THANKS for the inspiration - so cute!
ReplyDeleteFabulous background 🏰
ReplyDelete