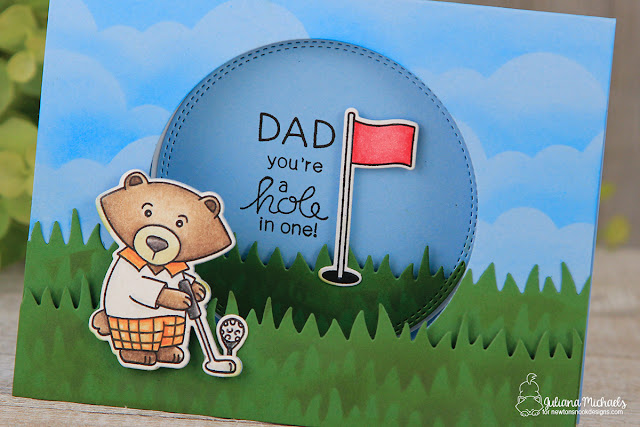
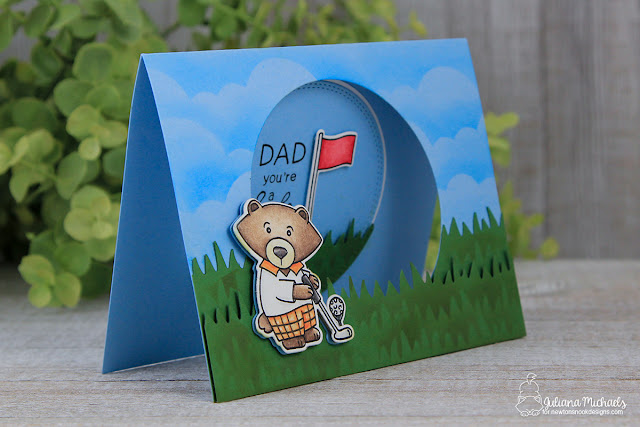
Hello friends and welcome to Day 1 of the Newton's Nook Designs May Release! Today we're featuring Winston's Tee Time stamp and coordinating die set. In this set, the adorable Winston is on par to help you celebrate all the special men in your life who love the game of golf! And he's definitely on time for creating some fabulous Father's Day cards! Keep reading to learn how the card I created came together and how to enter for you chance to win this new stamp set!
For my card, I created a fun little scene for Winston as he goes for a hole in one. The stamped images are colored with Prismacolor colored pencils and then blended with Gamsol and a blending stump.
Die Cut Masking - Sky and Grass Background:
Use Newton's Nook Designs Sky Border cloud die and cut a piece of scrap paper to create a mask. Position the mask onto your background cardstock color. Select a slightly darker ink color than the cardstock you are using and use an Ink Blending Tool.
Tap off the extra ink from the ink blending tool before applying it to your paper. This will help to avoid large ink splotches. Apply the ink by brushing upward from the mask onto the cardstock with a very light amount of pressure. Tapping off the excess ink and light pressure are the key to keeping the ink application even. Slide the mask down the paper and move it side to side to vary the position of the clouds and repeat the ink application process.
To create the grass, you're going to use the same technique as with the clouds. Begin by die cutting 2 strips of green cardstock using the Newton's Nook Designs Land Borders grass die.
Cut another strip of grass from scrap paper to create a mask. Position the mask onto the green die cut strips and add ink using Mowed Lawn Distress Ink and and Ink Blending Tool. To avoid large splotches of ink, stamp off some of the ink before blending it onto the cardstock.
This card is created from a piece of 5.5 x 11 inch blue cardstock folded in half. To create the circle opening in the card, I temporarily adhered the second layer of grass onto the card front, positioned the circle die over it and then die cut the circle piece. Make sure to have the card fully opened when die cutting the circle from it. (I just might have forgotten to do this the first time I was making this card, so I wanted to send out a little reminder if you want to try to make one of these yourself! LOL)
Die cut another circle from blue cardstock. Add the die cut grass, the stamped flag and sentiment to it and then adhere this to the inside of the card. Next, attach the other die cut grass pieces. To complete the scene add Winston and the golf ball to the card front with some double sided foam adhesive.
I hope you enjoyed learning about how this card came together! Now for some fun stuff! How would you like to win the “Winston’s Tee Time” Stamp Set?

For even more inspiration and your chance to win, make sure to visit each of the awesome Design Team Blogs:
PS...All of the new May Release products will be available on Friday, May 12 in the Newton's Nook Design Shop.


Thanks for the informative tutorial, I love how you've made this card and your ink blending on the grass and clouds. The results are beautiful!!!
ReplyDeleteYour card has so many layers! The coloring and blending of colors is beautiful!
ReplyDeleteLove the peep hole scene and your great tutorial on how you made the clouds and grass!
ReplyDeleteThis is gorgeous! Love how you played with the golf theme creating a hole and the color card base! Looks really fantastic!
ReplyDeleteAwww!!! How cute!!! Adorable card inside and out!!!
ReplyDeleteWow, I love your card, with the adorable Newton!!
ReplyDeleteThis is my favorite card so far in the hop but all are wonderful!
ReplyDeletethis is so nice card!
ReplyDeleteFAbulous card design with this circle window and the golf scene.
ReplyDeleteCute design! I think the circle cutout is very fitting considering the sentiment. Great new set!
ReplyDeleteWhat a fun window card. Love how used the clouds.
ReplyDeleteSuch a cute card...Hole in one and hole in your card - just adorable!!!
ReplyDeleteReally cute. Perfect for an avid golfer.
ReplyDeleteToo cute!
ReplyDeletewhat a fab card design, just perfect for a golf themed card
ReplyDeleteOh.My.Goodness.!!!This is Ah-mazing!!! The sponged background is gorgeous! your Winston is colored so beautifully! and the inside!!? So many aweosme details, lots of love went into this card for sure! So very lovely!!!
ReplyDeleteGreat card! Love that awesome design ♥
ReplyDeleteI love everything about this card. The fun scene, the colors, the clouds, the window, everything!
ReplyDeleteLove this interact card with style, so cute and Masculine!
ReplyDeleteWow! I love all those bright vivid colors on your 3D card--those layers are really tee-rific! Stamping enthusiast and golf addict that I am I would love to win this set!
ReplyDelete:) Marie
I like how the hole circle cut out made me think of a golf ball. :) Sweet card.
ReplyDeleteGreat job on the clouds.
ReplyDeleteLove how the card opens up.
Fun idea.
thanks for sharing.
what a fun card!
ReplyDeleteGreat inside of the card and the clouds are perfect
ReplyDeleteAwesome card:-)
ReplyDeleteThis card is really cool! I love how you did the clouds and grass! Thanks for sharing your tips! Such a fun way to have a unique card with the circle cut out too! Really cool!
ReplyDelete-Jen
Love your clouds! (Must buy this die!) Also love the different layers of your card! Very fun!
ReplyDeleteSeriously amazing card. Love how you finished it both inside and out. Love the dimension you created, so fun!
ReplyDeleteWhat an adorable card!! Love how you created the clouds and grass!! ~ Blessings, Tracey
ReplyDelete