Welcome to Day 1of Newton's Nook February Release! I'm so happy to have you stop by for a visit. The first set being shared from this release is Newton's Pot of Gold! Newton is ready for St. Patrick's Day or for wishing someone good luck. Make sure to keep reading to learn about the card I created and then how to enter for your chance to win the Newton's Pot of Gold Stamp set!
3. Close the lid and place the same circle die on top and line it up with the die cut circle. Use a piece of tape, such as Post-It Tape, to help hold it in place.

For today's card, I did lots of fun stamping techniques - including stamping and coloring with colored pencils, stamping with Versamark to create a patterned background and stamping a sentiment on a circle die cut. Read on to learn all about how to stamp a sentiment on a circle die cut perfectly every time!
How to stamp a sentiment on a circle die cut perfectly every time!
I don't know about you, but trying to curve a stamp sentiment on a circle die cut is kind of challenging for me. While creating my St. Patrick's Day card, I came up with a way to curve it perfectly every time using a stamp positioning tool such as the MISTI or Stamp Perfect.
1. Die cut a circle from cardstock.
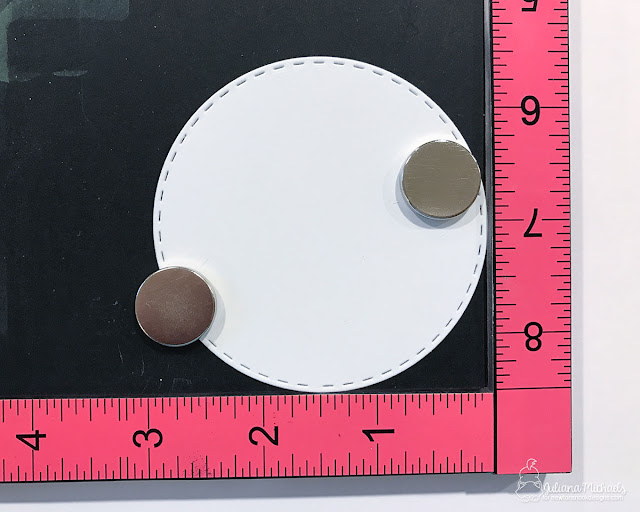
2. Place the circle on your stamp tool and hold it in place with the magnets. As always, when using a stamp tool, position the paper firmly into the corner to help secure it in place in case you need to stamp the image more than once.
4. Open the lid and line your sentiment up on the inside lid of the stamping tool, using the circle die on the outside as a guide.
5. Ink up your sentiment and stamp it onto the circle die cut!
With this technique, you can stamp it perfectly onto the circle die cut every time!
Along with all the fun stamping, I also used a new to me coloring tool - Sakura Glaze Pens and Metallic Pens! I used a Gold Metallic one to color the gold coins and the buckle on Newton's hat and I used a green Glaze Pen to color the shamrock. I love the shimmer and tiny bit of texture that they add!
Now, onto some fun! How would you like to win the “Newton’s Pot of Gold” Stamp Set?
This set will be given away to ONE lucky winner!
Here's how to win: Leave a comment on the NND blog and each of the Design Team blogs (see list below)! The winner will be chosen at random from the collective reveal posts. Make sure to check out each of their blogs and comment for your chance to win. You will not know which blog has been chosen, so the more you comment on the better your chances are of winning! You have until Thursday February 16th at 9pm CST to comment -- winners will be announced on the NND blog post on Friday, February 17th.
Check out all the awesome Design Team Blogs below to enter:


Great card! Love the layering.
ReplyDeleteCute card!
ReplyDeleteGreat tip on lining up that curved stamp. Thanks! Cute card.
ReplyDeleteWhat a great card! Love that stamped background you created! Thank you SO much for the tips on alignment! That is so helpful!
ReplyDeletethanks for the tip.
ReplyDeleteI know there is a lot you can do with the
Misti - so glad somebody thought of it.
the card is great.
thanks for sharing.
Beautiful card! Love the text into a circle. And then, Newton, the little cat is so cute!
ReplyDeleteSo super cute!
ReplyDeletethank you for showing how you used your Misti to do the circular stamping, great job!
ReplyDeleteVery cute card. Love the background. TFS
ReplyDeleteVery clever tip there Juliana, I often opt to use my stamps straight as it was easier but this IS easy??? Your card is absolutely adorable!TFS!
ReplyDeleteSweet card! Love the way you rounded the sentiment! Great tips on doing that! Love Newton's Pot of Gold set!
ReplyDeleteThis is awesome fun!
ReplyDeletesuch an adorable card :) love it !
ReplyDeleteWhat a fabulous card and clever idea on rounding the stamped image!! ~ Blessings, Tracey
ReplyDeleteyour card is super sweet!
ReplyDeleteJuliana, I like the way you explained how to get the sentiment lined up in the circle die cut. Thank you for the tutorial.
ReplyDeleteSweet sweet card:-)
ReplyDeletethanks for such a helpful tip!
ReplyDeleteThis is just sooo sweet! :)
ReplyDeleteCute. I like the curved sentiment and the twine.
ReplyDeleteSo cute, love your card background.
ReplyDeleteLove your card, the very soft colors were great.
ReplyDeleteOh Juliana, this is so wonderful. Many thanks for your explaining how it works to stamp the sentiment on a round circle.♥ I will try it.☺
ReplyDeleteHugs and greetings
Angela
This is just gorgeous! Love tone on tone stamping, your color choice and design! And thanks for great tips for stamping!
ReplyDeleteWhat a cute card and fun background!!
ReplyDeleteLove how you showed to stamp that die cut area, thank you
ReplyDeleteThis is fabulous! Thank you for sharing the details on how you curved the sentiment too! Love this idea!! The shiny gold on the coins is the perfect finishing touch too!
ReplyDeleteWhat a neat trick for stamping curved sentiments! Absolutely love your card and all the fun details!! <3
ReplyDeleteLove this cute card and thanks for sharing your tips on how you made it:)
ReplyDelete