Happy Birthday Card | Cupcake Inspiration Challenge 396

Hello crafty friends! Today I'm excited to share that Newton's Nook is this week's sponsor for a fun (new to me) challenge blog called Cupcake Inspirations. I'm playing along as one of the Guest Sweeties using Newton's Nook new stamp and die set called Newton Loves Cake!

Happy Birthday Card by Juliana Michaels featuring Newton's Nook Designs Newton Eats Cake Stamp and Die Set

Here is this week's cupcake inspiration image. As you can see, cats, pink and chocolate had to be included in my design! And even though you don't need to include a cupcake in the card design, I couldn't resist using the image of Newton with a cupcake!

Cupcake Inspiration Challenge 396

I stamped the image with Versafine Black Onyz and colored in the image using Prismacolor Colored Pencils. I used Sakura Gelly Roll Glaze Pens to color the sprinkles on the cupcake.

To create the background behind Newton, I used Distress Ink in Mowed Grass and Spun Sugar. I have included a complete supply list below for those of you interested in what products I used to create my card.


I sure hope you'll play along with us! I can't wait to see what you create!

Supplies:
Patterned Paper: My Favorite Things
Cardstock: American Crafts (Blue), Darice (White)
Sequins: Darice
Ink: Versafine Black Onyx, Distress Ink Mowed Lawn and Spun Sugar
Ink Blending Tool: Ranger 
Pens: Sakura Gelly Roll Glaze Pens

Happy Easter Cards with Ombre Background | Newton's Nook

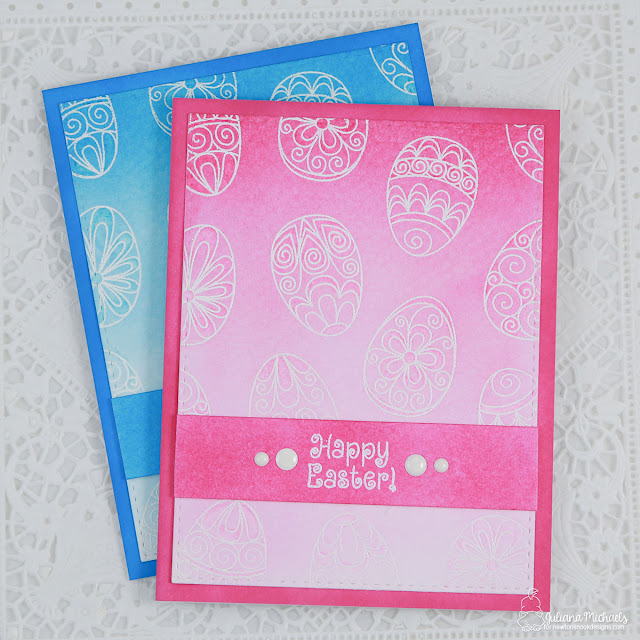
Hello friends! Today I'm sharing a couple of Easter cards I created using the Beautiful Spring stamp set by Newton's Nook Designs. I just love the swirly designs that look so much like paper quilling!

I'm also sharing my take on the Ombre Background that was recently shared by Jenifer McGuire. Her cards really inspired me however, after playing around with things a bit, I came up with a different take on the technique and I wanted to share it with you.

Happy Easter Cards with Ombre Background by Juliana Michaels featuring Newton's Nook Beautiful Spring Stamp Set

Creating beautifully blended backgrounds with Distress Inks can be a bit of a challenge. Many of us tend to get harsh edges when we apply the ink and they don't turn out looking soft and pretty. I have also had my arm get tired as I'm applying the ink! The technique I'm sharing today will help you achieve create a perfect blended result every time you work with Distress Inks.

I put together a short video that walks you through my technique for creating the ombre background. 
You can check out my video below or watch it on YouTube.


In my video I show you how to create an ombre background using watercolor paper, Distress Inks and foam blending tools. I have to admit, the Clarity brushes look amazing to work with, however, they really aren't in my budget so I wanted to find a way to create this same look for less.

After lots of trial and error, I've found the key for creating a perfect Distress Ink blended background - watercolor paper! I use Strathmore 400 series and I consistently achieve great results when I use it with Distress Inks, watercolor paints and watercolor markers such as Zig Clean Color.

Happy Easter Cards with Ombre Background by Juliana Michaels featuring Newton's Nook Beautiful Spring Stamp Set

When I use watercolor paper I never get those harsh ink edges from the blending tools. The ink doesn't soak into the paper right away, which gives you time to work with it and blend the ink and even better...your arm doesn't get tired from the blending!

Happy Easter Cards with Ombre Background by Juliana Michaels featuring Newton's Nook Beautiful Spring Stamp Set

I created the same card using different colors of ink. Just think of all the possibilities...green, orange, purple!

Happy Easter Cards with Ombre Background by Juliana Michaels featuring Newton's Nook Beautiful Spring Stamp Set

The sentiment is stamped on watercolor paper as well that was colored with Distress Ink. I heavily applied the ink to get the solid color. I also created the coordinating card front using regular cardstock. I didn't bother with watercolor for this piece because I wasn't worried about blending or trying to achieve an ombre look.

Happy Easter Cards with Ombre Background by Juliana Michaels featuring Newton's Nook Beautiful Spring Stamp Set

So, now it's your turn! Are you ready to create a perfect ombre ink blended background every time?! 

Supplies:
Stamp Positioning Tool - Hampton Art Stamp Perfect 
Watercolor Paper - Strathmore 400 Series
Embossing Powder - American Crafts Zing White
Heat Gun
Manual Die Cutting Machine - Cuttlebug
Cardstock - Core'dinations Premium Cardstock 110lb White

Newton's Nook Designs February Release | Day 3

Welcome to Day 3 of Newton's Nook February Release! Today we are sharing the third and final stamp set being shared from this release called Newton Loves Cake! Adorable Newton is ready to help you celebrate all the special cake moments in life. Make sure to keep reading to learn about the card I created and then how to enter for your chance to win the Newton Loves Cake Stamp set!

This stamp set is seriously adorable and I couldn't decide which image I liked the best, so I choose to stamp and color all 3 of the adorable Newton images and color them each a little differently.

Happy Birthday Card by Juliana Michaels featuring Newton's Nook Designs Newton Eats Cake Stamp and Die Set from the February 2017 Release.

Each image is stamped with Versafine Ink in Black Onyx and then colored with Prismacolor colored pencils.

Happy Birthday Card by Juliana Michaels featuring Newton's Nook Designs Newton Eats Cake Stamp and Die Set from the February 2017 Release.

To create the peek a boo images, I used circle dies to create the openings on the white cardstock panel. Before I added the cats, I splattered a little Heidi Swapp Color Shine Ink in Pink Rose. I then tucked the die cut Newton's behind the openings and adhered them in place. The final touch was the addition of some shiny sequins.

Happy Birthday Card by Juliana Michaels featuring Newton's Nook Designs Newton Eats Cake Stamp and Die Set from the February 2017 Release

Now, onto some fun! How would you like to win the “Newton Loves Cake” Stamp Set?

Newton Eats Cake Stamp Set by Newton's Nook Designs


If you said yes, here's what you need to do to win...
Leave a comment on the NND blog and each of the Design Team blogs (see list below)! The winner will be chosen at random from the collective reveal posts. Make sure to check out each of their blogs and comment for your chance to win. You will not know which blog has been chosen, so the more you comment on the better your chances are of winning! You have until Thursday February 16th at 9pm CST to comment -- winners will be announced on the NND blog post on Friday, February 17th.


Check out all the awesome Design Team Blogs below to enter:

Newton's Nook Designs February Release | Day 2

Welcome to Day 2 of the Newton's Nook February Release! Today the new Beautiful Spring stamp and die set is being revealed. This is another set that is part of the Beautiful Swirls series which is inspired by the gorgeous swirls of paper quilling. Beautiful Blossoms and Beautiful Wings are part of this series, and I think they would all be gorgeous to mix and match with each other! Make sure to keep reading to learn about the card I created and then how to enter for your chance to win the Beautiful Spring stamp set!

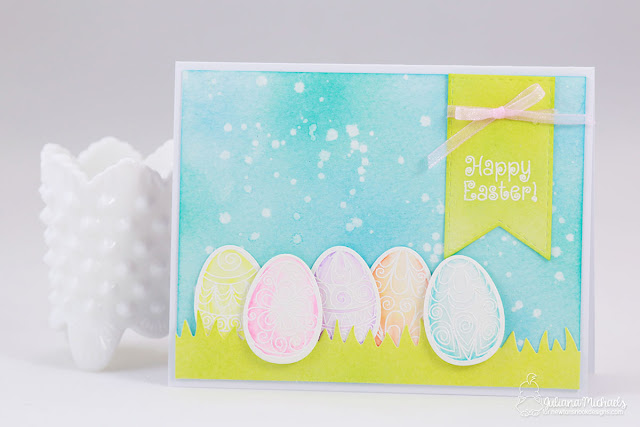
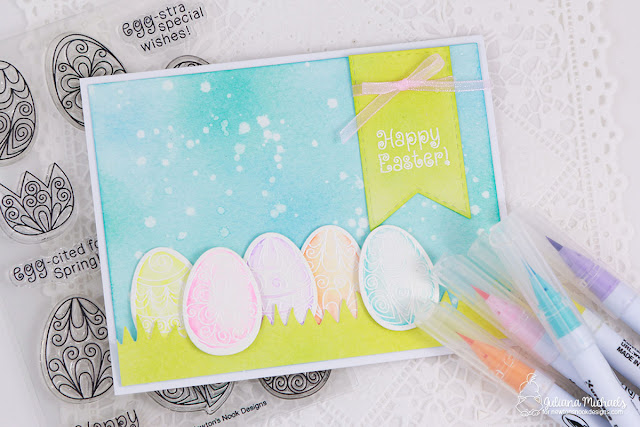
This set screamed to be watercolored, and so I did just that to create a soft, pastel Easter card! For all the pieces of the card, I used watercolor paper. I find it works best with watercolor markers and is perfect for Distress Ink blending. I began by stamping all the images using Versamark Embossing Ink. I then sprinkled them with white embossing powder and heat set it using a heat gun.

Happy Easter Card by Juliana Michaels featuring Newton's Nook Designs Beautiful Spring Stamp Set

To color the eggs, I used Zig Clean Color Real Brush Markers in the following colors: Light Pink, Light Blue, Lilac, Lemon Yellow and Bright Yellow. I only added a bit of color to the edges and then used a water brush to blend the ink toward the center.

Happy Easter Card by Juliana Michaels featuring Newton's Nook Designs Beautiful Spring Stamp Set

I used the Ink Blending technique and Distress Ink in Salty Ocean to create the background. I then added some splatters of water. I did some color mixing with Distress Ink in Mustard Seed and Salty Ocean to create the green I used on the banner and grass. Speaking of grass, that die is a new die being released by Newton's Nook called Land Borders. And I love how it makes the perfect place for my little Easter eggs to sit!

Happy Easter Card by Juliana Michaels featuring Newton's Nook Designs Beautiful Spring Stamp Set

So, how would you like to win the “Beautiful Spring” Stamp Set?

Newton's Nook Designs Beautiful Spring Stamp Set

This set will be given away to ONE lucky winner!

Here's how to win: Leave a comment on the NND blog and each of the Design Team blogs (see list below)! The winner will be chosen at random from the collective reveal posts. Make sure to check out each of their blogs and comment for your chance to win. You will not know which blog has been chosen, so the more you comment on the better your chances are of winning! You have until Thursday February 16th at 9pm CST to comment -- winners will be announced on the NND blog post on Friday, February 17th.


Check out all the awesome Design Team Blogs below to enter:

Newton's Nook Designs February Release | Day 1

Welcome to Day 1of Newton's Nook February Release! I'm so happy to have you stop by for a visit. The first set being shared from this release is Newton's Pot of Gold! Newton is ready for St. Patrick's Day or for wishing someone good luck. Make sure to keep reading to learn about the card I created and then how to enter for your chance to win the Newton's Pot of Gold Stamp set!

For today's card, I did lots of fun stamping techniques - including stamping and coloring with colored pencils, stamping with Versamark to create a patterned background and stamping a sentiment on a circle die cut. Read on to learn all about how to stamp a sentiment on a circle die cut perfectly every time!

Happy St. Patrick's Day Card by Juliana Michaels featuring Newton's Nook Designs Newton's Pot of Gold Stamp Set

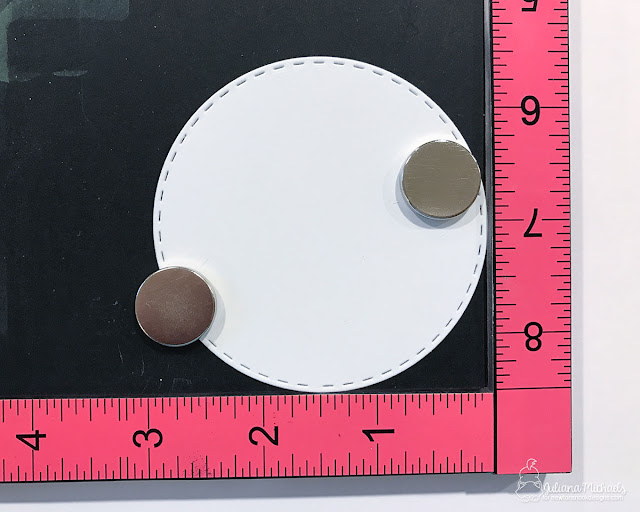
How to stamp a sentiment on a circle die cut perfectly every time!

I don't know about you, but trying to curve a stamp sentiment on a circle die cut is kind of challenging for me. While creating my St. Patrick's Day card, I came up with a way to curve it perfectly every time using a stamp positioning tool such as the MISTI or Stamp Perfect.

1.  Die cut a circle from cardstock.

2.  Place the circle on your stamp tool and hold it in place with the magnets. As always, when using a stamp tool, position the paper firmly into the corner to help secure it in place in case you need to stamp the image more than once.


How to stamp a sentiment on a circle die cut perfectly every time - tutorial by Juliana Michaels

3.  Close the lid and place the same circle die on top and line it up with the die cut circle. Use a piece of tape, such as Post-It Tape, to help hold it in place.

How to stamp a sentiment on a circle die cut perfectly every time - tutorial by Juliana Michaels

4.  Open the lid and line your sentiment up on the inside lid of the stamping tool, using the circle die on the outside as a guide. 


How to stamp a sentiment on a circle die cut perfectly every time - tutorial by Juliana Michaels

5.  Ink up your sentiment and stamp it onto the circle die cut!

How to stamp a sentiment on a circle die cut perfectly every time - tutorial by Juliana Michaels

With this technique, you can stamp it perfectly onto the circle die cut every time!

Happy St. Patrick's Day Card by Juliana Michaels featuring Newton's Nook Designs Newton's Pot of Gold Stamp Set

Along with all the fun stamping, I also used a new to me coloring tool - Sakura Glaze Pens and Metallic Pens! I used a Gold Metallic one to color the gold coins and the buckle on Newton's hat and I used a green Glaze Pen to color the shamrock. I love the shimmer and tiny bit of texture that they add!

Happy St. Patrick's Day Card by Juliana Michaels featuring Newton's Nook Designs Newton's Pot of Gold Stamp Set

 Now, onto some fun! How would you like to win the “Newton’s Pot of Gold” Stamp Set?

Newton's Nook Designs Newton's Pot of Gold Stamp Set

This set will be given away to ONE lucky winner!

Here's how to win: Leave a comment on the NND blog and each of the Design Team blogs (see list below)! The winner will be chosen at random from the collective reveal posts. Make sure to check out each of their blogs and comment for your chance to win. You will not know which blog has been chosen, so the more you comment on the better your chances are of winning! You have until Thursday February 16th at 9pm CST to comment -- winners will be announced on the NND blog post on Friday, February 17th.


Check out all the awesome Design Team Blogs below to enter:

Valentine's Day Cards Printable | Therm O Web Deco Foil

Hello crafty friends! Just a quick post to let you know about a Valentine's Day Cards Printable I designed for Therm O Web and that you can download for free. I used the printable, along with Therm O Web's Deco Foil, to create a set of simple, but trendy Valentine's. The printable contains four different designs that are sure to be perfect for putting together Valentine's for your family, for your kids to give to their friends or for that special someone.  Here's a peak at one of the designs I created and of course, it has a turtle theme!

Valentine's Day Cards with Therm O Web Deco Foil by Juliana Michaels with free Valentine's Day Cards Printable

Now, head on over to the Therm O Web blog to learn more about my Valentine's Day Cards Printable. While you're there, make sure to download your copy so that you can get started crafting some Valentine's hand made with love!

Newton's Nook | Pug Hugs Card

This past weekend was full of card making craziness! I spent Friday evening coloring images for the upcoming Newton's Nook Designs February Release and then I spent time on Saturday and Sunday putting the cards together. I can't wait for you all to see the new stamps and dies that are part of the next release. You are going to love them!

Until the reveal for the new goodies, here's a little Newton's Nook love for you. I'm sharing a card I created for Inky Paws Challenge No. 40. The new challenge is a sketch challenge. I love sketches and couldn't resist playing along using the Pug Hugs stamp and die set.

Pug Hugs Card by Juliana Michaels featuring Newton's Nook Designs Pug Hugs Stamp and Die set and playing along with the Inky Paw Challenge No. 40

This is the sketch for the challenge. And yes, I followed the sketch pretty closely...I even added a little bow using some purple twine. LOL
The cute little pug is stamped with Versafine Black Onyx and then colored with Prismacolor Colored Pencils. I blended the pencil with Gamsol and a blending stump. I then used the coordinating dies to cut out the pug and then added a cute purple bow! The purple bow inspired me to use some patterned paper from my stash - Elle's Studio Little Moments 6x6 Paper Pad. It had some purple in it that was just perfect for that cute pug!

Pug Hugs Card by Juliana Michaels featuring Newton's Nook Designs Pug Hugs Stamp and Die set and playing along with the Inky Paw Challenge No. 40

If you aren't familiar with the Newton's Nook Inky Paws Challenge, let me share a bit about it. They have 2 challenges per month and they start on the 1st and 3rd Monday of each month. The Challenge winner is selected from all of the challenge entries and they receive a $10 store credit to the Newton's Nook online store and an Inky Paws Challenge Top Pick Badge to add to their blog! You can find all the rules for playing along on their blog (here). Now, it's your turn to play along. I can't wait to see what you create and share!

Newton's Nook Designs Sweet Treats Blog Hop

Welcome to the Newton's Nook Sweet Treats Blog Hop! To help celebrate Valentine's Day the Newton's Nook Design Team has come together to create and share some amazing treat related creations such as treat holders, tags for treat bags and more. Along with the sharing, we also have a fun giveaway! Make sure to keep reading to learn about the Valentine's Day pillow boxes I created and then how to enter for your chance to win!

For my sweet treat, I created a set of Valentine's Day pillow boxes using the Woodland Duos stamp set.

Valentine's Day Pillow Boxes by Juliana Michaels featuring Newton's Nook Designs Woodland Duos Stamp Set and Darling Hearts Die Set

I used a set of pre-made kraft pillow boxes, but there are tons of free templates online that you can download and use to create your own.

Valentine's Day Pillow Boxes by Juliana Michaels featuring Newton's Nook Designs Woodland Duos Stamp Set and Darling Hearts Die Set

I began by stamping each of the adorable critters combos with Versafine Black Ink. Once the ink was dry, I colored the images using Prismacolor Colored Pencils and blended them with Gamsol and blending stumps.

Valentine's Day Pillow Boxes by Juliana Michaels featuring Newton's Nook Designs Woodland Duos Stamp Set and Darling Hearts Die Set

I then die cut each image using the stitched heart from the Darling Hearts die set.

Valentine's Day Pillow Boxes by Juliana Michaels featuring Newton's Nook Designs Woodland Duos Stamp Set and Darling Hearts Die Set

I covered each of the pillow boxes with patterned paper and then adhered the die cut heart. I used black ink to stamp the coordinating sentiments from the stamp set onto the patterned paper.

Valentine's Day Pillow Boxes by Juliana Michaels featuring Newton's Nook Designs Woodland Duos Stamp Set and Darling Hearts Die Set

The final step was of course, to fill each of them with chocolate and make them the perfect Valentine treat!

Valentine's Day Pillow Boxes by Juliana Michaels featuring Newton's Nook Designs Woodland Duos Stamp Set and Darling Hearts Die Set

Would you like to win a $10 store credit to Newton's Nook Designs online shop? We are giving them out to TWO lucky winners!


Here's how to win:

Comment on the NND blog and Design Team blogs (see list below)! The winner will be chosen at random from the collective reveal posts. Make sure to check out each of their blogs and comment for your chance to win. You will not know which blog has been chosen so the more you comment on the better your chances are of winning! You have until Monday, February 6th at 9pm CST to comment -- winners will be announced on the NND blog on Tuesday, February 7th.


Check out all the awesome Design Team Blogs below to enter:

Subscribe