Valentine's Day Word Art and Scrapbook Page Titles | Digital Cut Files

Hello crafty friends! As I promised last week, when I shared the Heart Background Digital Cut Files, here are a couple more Love and Valentine's Day themed digital cut files for you to use on all your crafty projects. Both of these are word art cut files and would be lovely used to create either a home decor piece or as a title on a scrapbook page.

Digital Cut File | Moon & Back

Moon and Back Free Digital Cut File by Juliana Michaels

Digital Cut File | XOXO

Moon and Back Free Digital Cut File by Juliana Michaels

These free cut files can be used with a variety of electronic digital cutting machines, including the Silhouette Cameo and Cricut Explore. They can be used to create a full range of projects, including cards, gift wrap, tags, home decor, scrapbook pages and more. The only limit to what you can create using this cut file is your own imagination. This digital file is available in SVG, PNG, DXF and Studio formats and you may download this digital cut file for your own personal use. If you wish to use my cut files for more than your own personal projects, please contact me. If you have questions, concerns or comments about my digital cut files, please feel free to leave me a message in the comment section.

• • • • • • • • • • • • • • • • • • • •

I hope you enjoy these new cut files. As always, I'd love for you to tag me on social media if you use them with #julianamichaels or #17turtles!

Love & Chocolate Newton's Nook | Stamped Background Paper

Hello friends! Today I'm sharing a yummy Valentine's Day Card I created using the Newton's Nook Love and Chocolate Stamp Set. This set was just released as part of their January reveal.

Love and Chocolate Valentine's Day Card with stamped background paper using Newton's Nook Designs Love and Chocolate Stamp Set by Juliana Michaels

I decided to create my own background paper by randomly stamping the various chocolates onto a piece of white cardstock using Color Box Pigment Ink in Expresso. I have found that pigment inks work best when working with colored pencils. Even though you need to either allow these inks time to dry or heat emboss them, they will not smudge when you color over them with Prismacolor Colored Pencils.

On my card, I choose to heat emboss the images using clear embossing powder. I then went to town coloring all the chocolates in colors to mimic milk, white and dark chocolate! Yummy indeed, but wouldn't it be nice if they were real!

Stamped Background Paper and choosing colors for images - Juliana Michaels

Making Your Own Background Paper With Stamps

Here's a little behind the scenes on how my cards come together when I'm creating a stamped background.  I usually practice stamping the design several times until I get the look I'm going for or a design that pleases my eye. Typically, I try to avoid stamping the same image next to itself. I also try not to stamp images in straight lines to help give the design a more random and free flowing feel.

Once I have the pattern down, I then use some of these practice pieces to color on and decide which colors I want to use and which images I want to color what color. In this photo, I put a little check mark by the color combos that I liked for each of the different chocolate shapes.


After I finished creating my background, I die cut a banner shape from dark brown cardstock and stamped the sentiment onto it using Versamark Watermark Ink. I then heat embossed it with white embossing powder. The final step was a little pink floss bow.

Love and Chocolate Valentine's Day Card with stamped background paper using Newton's Nook Designs Love and Chocolate Stamp Set by Juliana Michaels

So, do you like to create your own background paper using stamps? Do you have any fun tips to share on how you do it? I'd love to hear all about it! Thanks so much for stopping by today!

Heart Background Digital Cut Files

I know many of you come to my blog for the free digital cut files and I know I haven't been creating or sharing very many of them lately. As you may have noticed, I've gotten more and more into card making lately. This has left me with a little less time to create my free cut files. Recently, however, I took some time to put together some new cut files just for you. Some of them are brand new and some of them are ones that were once available in my Etsy Shop. I decided to bring them out of the vault and allow everyone to enjoy them!

Below you will find two new background cut files with a bit of a love theme. I thought it would be fun to create and share some Valentine's themed cut files over the next couple of weeks, so keep a look out for a couple more posts.


Digital Cut File | Hand Drawn Hearts Background

Hand Drawn Hearts Background Free Digital Cut File by Juliana Michaels

Digital Cut File | Heartfelt Background

Heartfelt Background Free Digital Cut File by Juliana Michaels

These free cut files can be used with a variety of electronic digital cutting machines, including the Silhouette Cameo and Cricut Explore. They can be used to create a full range of projects, including cards, gift wrap, tags, home decor, scrapbook pages and more. The only limit to what you can create using this cut file is your own imagination. This digital file is available in SVG, PNG, DXF and Studio formats and you may download this digital cut file for your own personal use. If you wish to use my cut files for more than your own personal projects, please contact me. If you have questions, concerns or comments about my digital cut files, please feel free to leave me a message in the comment section.

• • • • • • • • • • • • • • • • • • • •

I hope you enjoy these new ones that I'm sharing with you today and as I always, I'd love for you to tag me on social media if you use them with #julianamichaels or #17turtles!

Snowflakes & Friends | Therm O Web Deco Foil Transfer Gel

Hello friends! Today, I want to share with you about a new product from Therm O Web called Deco Foil Transfer Gel. They released this product at the recent Creativation Show (formally known as CHA) in Phoenix, AZ. This new product is a fun way to add a touch of dimension to all your foiled projects.

Friends and Snowflakes Card by Juliana Michaels featuring Therm O Web Deco Foil Transfer Gel

Thermo Web Deco Foil Transfer Gel Instructions:
  1. Begin with a piece of watercolor paper or other paper suitable for use with mixed media type mediums.
  2. Tape the paper to your surface using a repositionable tape.
  3. Tape the stencil in place on top of the paper with the same type of tape.
  4. Use a palette knife or similar tool to apply Deco Foil™ Transfer Gel over the stencil.
  5. Remove excess gel by gently pulling knife flat across surface. 
  6. Return any excess gel to the jar.
  7. Make sure you clean your stencil immediately with cold water, a drop of dish soap and gentle finger scrubbing.
  8. Let the gel dry at least 1 hour or until the gel has become completely clear.
  9. Cover the stenciled design with Deco Foil™ Transfer Sheet, place inside a folded piece of parchment paper and run it through a preheated hot laminator.
  10. Let cool slightly and gently peel away the transfer sheet to reveal your beautifully foiled design.

For this card, I used a stencil from Echo Park and the Lapis Watercolor Deco Foil. After I completed the foiling process, I die cut the foiled panel and adhered it to a piece of patterned paper and then to the card base using Therm O Web's Easy Tear Tape.

Friends and Snowflakes Card by Juliana Michaels featuring Therm O Web Deco Foil Transfer Gel

Next, I stamped and die cut the sentiment piece and adhered it with the Easy Tear Tape as well. The ribbon was attached using Therm O Web's Supertape. For the final touch, I tied on the small snowflake charm.

Friends and Snowflakes Card by Juliana Michaels featuring Therm O Web Deco Foil Transfer Gel

I hope you enjoyed learning all about the new Therm O Web Deco Foil Transfer Gel! If you have any questions about it, feel free to leave a comment below and I will answer it as soon as possible.

Friends and Snowflakes Card by Juliana Michaels featuring Therm O Web Deco Foil Transfer Gel

Want more ideas and inspiration on how to use this new products? Here's a peek at the other card I created and that I'm sharing on the Therm O Web blog today.

Sneak Peek Thanks Card by Juliana Michaels featuring Therm O Web Deco Foil Transfer Gel

I invite you to visit the Therm O Web blog to learn more about this amazing new product, to see the other card I created, and to see what the other designers have created and shared as well. I have a feeling you all are going to love this new product as much as I do!

Newton's Nook Designs January Release | Day 4

Welcome to the 4th and final day of the Newton's Nook January Release! What a great week it has been. Don't you think? The final set being shared today is Newton's Happy Mail. This set features the adorable Newton sending out some happy mail just in time for Valentine's Day! Make sure to keep reading to learn about the card I created and then how to enter for your chance to win the Newton's Happy Mail Stamp set!

Newton's Nook Designs January 2017 Release

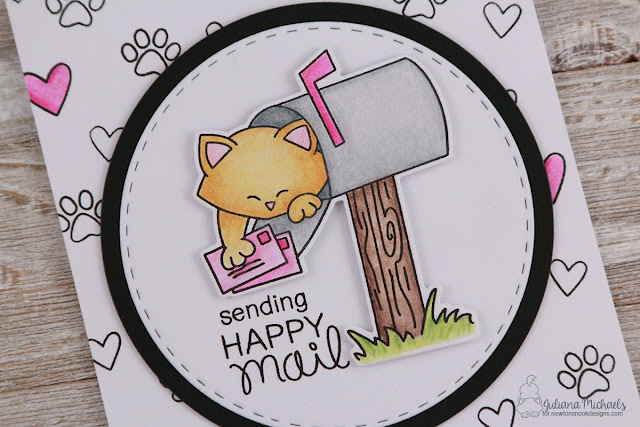
I couldn't resist coloring Newton with my Prismacolor Colored Pencils. I then die cut him and adhered him to the center of a die cut circle with some double sided foam adhesive.

Sending Happy Mail Card by Juliana Michaels featuring Newton's Happy Mail Stamp and Die Set from the January 2017 Release

I created the background by randomly stamping hearts and paw prints onto a piece of white cardstock. I then colored in the hearts to add a bit of interest and to coordinate with the happy mail from Newton. 

This set is purrfect for Valentine's Day or any day you want to send a little love and happiness!

Sending Happy Mail Card by Juliana Michaels featuring Newton's Happy Mail Stamp and Die Set from the January 2017 Release

So....would you love to win the “Newton's Happy Mail” Stamp Set? If the answer is yes, keep reading.

Newton's Happy Mail Stamp Set by Newton's Nook Designs

This stamp set will be given away to ONE lucky winner!

Here's how to win: Comment on the NND blog and Design Team blogs linked below. The winner will be chosen at random from the collective reveal posts. Make sure to visit each blog and leave a comment for your chance to win. You won't know which blog has been chosen, so the more you comment on the better your chances are of winning! You have until Thursday January 19th at 9pm CST to comment -- winners will be announced on the Newton's Nook blog on Friday, January 20th. Good luck and happy hopping!


I want to thank each and every one of you who have stopped by and commented this week. Your comments put a smile on my face and brought me so much joy!

Newton's Nook Designs January Release | Day 3

Welcome to Day 3 of the Newton's Nook January Release! Thanks so much for stopping by today! The set being shared today is the Pug Hugs set. It features two adorable pugs that are sure to make your smile!  I invite you to keep reading to learn about the card I created and then how to enter for your chance to win the Pug Hugs Stamp set!

Newton's Nook January Release 2017
The sentiment I used mentions only one pug, but why not send two? These little guys are so adorable all dressed up and ready to party!

Birthday Pug Card by Juliana Michaels featuring Newton's Nook Designs Pug Hugs Stamp and Die Set

I stamped the images using Versafine Pigment Ink in Onyx Black. Once dry, I colored them using Prismacolor Colored Pencils and I blending them using a blending stump and Gamsol. I then die cut each image and adhered the adorable party hats and bow ties to dress them up a bit.

Next, I adhered all of the images and the sentiment to the card from. I used some double sided foam adhesive to adhere the pug on the far left to add a bit of dimension to the card.

Birthday Pug Card by Juliana Michaels featuring Newton's Nook Designs Pug Hugs Stamp and Die Set

So....would you like to win the “Pug Hugs” Stamp Set? If the answer is yes, keep on reading!

Pug Hugs Stamp Set by Newton's Nook Designs

This stamp set will be given away to ONE lucky winner!

Here's how to win: Comment on the NND blog and Design Team blogs linked below. The winner will be chosen at random from the collective reveal posts. Make sure to visit each blog and leave a comment for your chance to win. You won't know which blog has been chosen, so the more you comment on the better your chances are of winning! You have until Thursday January 19th at 9pm CST to comment -- winners will be announced on the Newton's Nook blog on Friday, January 20th. Good luck and happy hopping!

Tatiana Trafimovich

If this is your first visit to the hop, make sure to check out my Newton's Nook Designs January Release | Day 2  and Day 1 post's to check out the other adorable stamp and die set!

Newton's Nook Designs January Release | Day 2

Welcome to Day 2 of the Newton's Nook January Release! The set being shared today is the Love and Chocolate Stamp and Die set. Everyone loves chocolate right?! Make sure to keep reading to learn about the card I created and then how to enter for your chance to win the Woodland Duos Stamp set!
Newton's Nook January Release

I didn't use the yummy chocolate stamps on the card I made, but instead I used the scrumptious looking macaroons! I had a blast creating a fun background using some heart dies to create a stencil.  

You Make Life Sweeter Card by Juliana Michaels featuring Newton's Nook Designs January Release Love and Chocolate Stamp and Die Set with Stencil and Distress Ink Background

DIY Stencil with Die Cuts

To create the stencil, I randomly placed the heart dies onto the cardstock and ran it through my Cuttlebug. I repeated this process until the entire piece was covered with hearts.

DIY Stencil with Die Cuts and Distress Ink by Juliana Michaels

Before I used the stencil, I inked a piece of cardstock using Spun Sugar Distress Ink and a foam blending tool. 

DIY Stencil with Die Cuts and Distress Ink by Juliana Michaels

Next, I taped the cardstock to hold it in place and then taped the stencil on top of it using washi tape. Just make sure the tape is re-positionable so it doesn't tear your paper when you remove it. For this step, I used a darker pink - Picked Raspberry.

DIY Stencil with Die Cuts and Distress Ink by Juliana Michaels

I love the contrast between the lighter and darker shades of pink!

DIY Stencil with Die Cuts and Distress Ink by Juliana Michaels

To embellish the card, I stamped and die cut five of the macaroons and colored them with colored pencils. I used Gamsol and blending stumps to help blend the pencil. I stacked them up on the cute cake stand and adhered the piece to the card front using doubled sided foam adhesive. The final touch was the sweet little sentiment!

You Make Life Sweeter Card by Juliana Michaels featuring Newton's Nook Designs January Release Love and Chocolate Stamp and Die Set with Stencil and Distress Ink Background

So....would you like to win the “Love and Chocolate” Stamp Set? If the answer is yes, keep reading.

Newton's Nook Designs Love and Chocolate Stamp Set

This stamp set will be given away to ONE lucky winner!

Here's how to win: Comment on the NND blog and Design Team blogs linked below. The winner will be chosen at random from the collective reveal posts. Make sure to visit each blog and leave a comment for your chance to win. You won't know which blog has been chosen, so the more you comment on the better your chances are of winning! You have until Thursday January 19th at 9pm CST to comment -- winners will be announced on the Newton's Nook blog on Friday, January 20th. Good luck and happy hopping!

Newton's Nook Designs January Release | Day 1

Welcome to Day 1 of Newton's Nook January Release! I'm so happy to have you stop by for a visit. The first set being shared from this release is the Woodland Duos set. Check out those adorable critters snuggled up into the shape of a heart! This set also coordinates perfectly with the Darling Hearts Die Set! Make sure to keep reading to learn about the card I created and then how to enter for your chance to win the Woodland Duos Stamp set!
Newton's Nook January Release

For this card, I began by stamping the cute little owls onto white cardstock with Versafine Pigment Ink in Black Onyx. I then colored in the critters using Prismacolor Colored Pencils and blended the colors using Gamsol and a blending stump. I then used the Darling Hearts die to cut out the image. After I did all this, the idea of doing a spinner card popped into my head.

Owl Be Yours Spinner Card By Juliana Michaels featuring Newtons Nook Woodland Duos Stamp Set from the January 2017 Reveal

 I'd never made a spinner card, so after a little Google searching and came across an easy tutorial by Laura Fadora. Once I watched her video, I knew I had to make one. They are such a fun interactive card and I tend to really love that kind! To get the full effect of the spinner, I repeated the stamping, coloring and die cutting to create a front and back image for the spinner. Another fun option I thought of, after I had completed this card, is that it could be fun to put the sentiment on the back side of the spinner. I may have to try that next time!

Owl Be Yours Spinner Card By Juliana Michaels featuring Newtons Nook Woodland Duos Stamp Set from the January 2017 Reveal

Of course, no interactive card is complete without a little video to show you how it works.  The trick to making it work is to wind it up before you close the card. You then stick it in the envelope. When the recipient opens the card, this is what they will see!


So....would you like to win the “Woodland Duos” Stamp Set? If the answer is yes, keep reading.

Newton's Nook January Release Woodland Duos Stamp Set

This stamp set will be given away to ONE lucky winner!

Here's how to win: Comment on the NND blog and Design Team blogs linked below. The winner will be chosen at random from the collective reveal posts. Make sure to visit each blog and leave a comment for your chance to win. You won't know which blog has been chosen, so the more you comment on the better your chances are of winning! You have until Thursday January 19th at 9pm CST to comment -- winners will be announced on the Newton's Nook blog on Friday, January 20th. Good luck and happy hopping!

Newton's Nook Designs
Amanda Bodine
Holly Endress
Ellen Haxelmans
Larissa Heskett
Samantha Mann
Juliana Michaels
Naki Rager
Maria Russell
Jennifer Timko
Tatiana Trafimovich

Crazy Boxer Birthday Card

Hello all! Just a quick post today to share a birthday card I created for a dear friend who happens to love Boxers! When I sat down to create a card for her, I knew I had to use the Boxer from the Crazy Dog Stamp Set by Tim Holtz.

I colored it with my Prismacolor Colored Pencils and then fussy cut the hat and present and die cut the dog using the Crazy Dog dies.

Crazy Boxer Happy Birthday Card by Juliana Michaels featuring Tim Holtz Crazy Dog Stamp Set and Right At Home Simple Sentiments Stamp Set

Crazy Boxer Happy Birthday Card by Juliana Michaels featuring Tim Holtz Crazy Dog Stamp Set and Right At Home Simple Sentiments Stamp Set

The layout was inspired by Freshly Made Sketches 270... 
and the color combo by Color Throwdown 425.

Thanks so much for stopping by! Make sure to stop back by tomorrow as we start off the Newton's Nook January Release! Each day you'll have a chance to win one of the new stamp sets from this release!

Sweater Weather Friends Card | Newton's Nook

Winter is in full effect here on the North coast, and although I'm not much of a cold weather fan, I think I'll survive as long as I've got a warm sweater to wear and something warm to drink - like coffee!

Speaking of warm sweaters, have you see the Sweater Weather stamp set by Newton's Nook? It's perfect for creating a variety of winter themed cards, and it's a blast coloring the cuddly sweaters that the adorable critters are wearing.  

The card that I'm sharing today is being featured over on the Newton's Nook Blog. It's my first card as a design team member for them and I'm so excited about this new adventure in the card making world!

Now, let me share a bit about how I created my card. I stamped the image using Versafine Pigment Ink in Black Onyx. I then colored the cute critters using Prismacolor Colored Pencils and blended them using Gamsol (odorless mineral spirits) and a blending stump. This is one of my favorite ways to color right now!

Sweater Weather Friends Together Card by Juliana Michaels featuring Newton's Nook Sweater Weather Stamp and Die Set #newtonsnook

What's the Best Ink for use with Prismacolor Colored Pencils?

I've found Versafine Pigment Ink to be the best ink to use with colored pencils. I tried both Ranger Archival Ink and Memento Ink and they both smudged and smeared when I colored over them with the pencils. I tried waiting longer to let the ink dry and I even tried drying the ink with my heat gun. Neither of these made a difference. All I can assume is that the pencils must react somehow with the ink. One other ink tip I have to share is that when using Versafine Ink, make sure to let the ink dry completely before you begin coloring. It is a pigment ink, so it take a little bit of time for it to dry. Once the ink is dry though, feel free to color away with your favorite colors!


I created the background by applying Distress Ink in Tumbled Glass using a Mini Round Ink Blending Tool. I then sprinkled it with a bit of water using a paint brush and then dried it with a paper towel. I love how this makes the background look like falling snow!

I hope you enjoyed learning more about how I created my card and about what ink I prefer to use when coloring with Prismacolor Colored Pencils. Have you found an ink that you prefer to use with them? I'd love for you to share your thoughts about this in the comments sections. Thanks for stopping by and have a great day!

Therm O Web 3D Foam Squares

Hey crafty friends, I'm up on the Therm O Web blog today. I'm sharing a card and gift bag I created using their fabulous 3D Foam Squares to help add dimension to these adorable die cut critters. I'd love for you to stop by and check out all the details!

Dimensional Die Cut using Therm O Web 3D Foam Squares by Juliana Michaels | Newton's Nook Sweater Weather Stamps and Dies

Thanks so much for your visit!

2016 Top 10 Blog Hop Winner

Sorry for the delay, but I'm finally getting around to posting the winner from my 2016 Top 10 Blog Hop.

The winner is Karen Ladd. Congratulations Karen!!! 


Please send me a PM on Facebook with your email address and what online store you would like your $25 gift card to be from.

I want to thank all of you who stopped by and for your sweet comments on my projects. They all warmed my heart and put a smile on my face!
Subscribe