Bella Blvd + Card Maker Blog Hop | Dual Embossing

Hello everyone and welcome! Today I'm sharing a one-layer card using a fun technique that I'm calling Dual Embossing. I created this card for the CardMaker and Bella Blvd Blog Hop using the Illustrated Faith Fly Free stamp set. You'll find all the blog hop details below. First though, I invite you to check out this fun technique!

Dual Embossing and Distress Inking Everything Beautiful Card by Juliana Michaels featuring Bella Blvd Illustrated Faith Fly Free Stamp Set and Ranger Distress Inks

1.  Begin by positioning your stamps on your MISTI. If you don't have one, I recommend stamping one image at a time.  Below you can see how I positioned my stamps. 

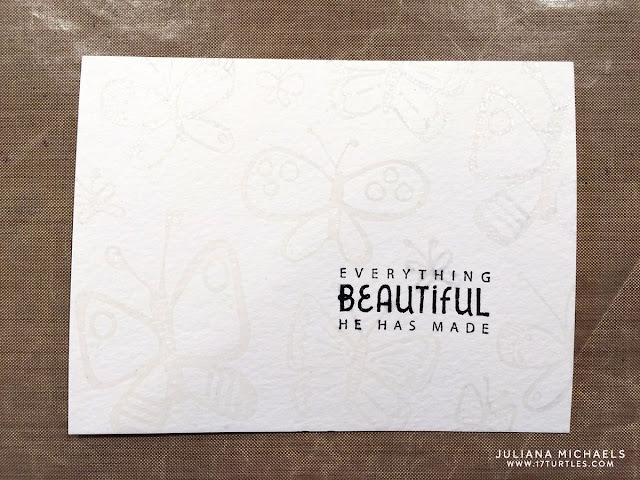
2.  Stamp the images onto watercolor paper using Versamark Embossing Ink.

Tip:  Remember to wipe down the paper with an embossing powder pouch or tool before you begin stamping to eliminate moisture and any residual skin oils your fingertips may have left on the paper surface. If you are new to heat embossing check out my Heat Embossing Tutorial on the CardMaker Magazine Blog.

Dual Embossing and Distress Inking Card Tutorial by Juliana Michaels featuring Bella Blvd Illustrated Faith Fly Free Stamp Set and Ranger Distress Inks

3.  Remove the stamps from your MISTI, clean them and position them to fill in the rest of the space where you didn't stamp. This can be a little tricky with the clear ink.

Dual Embossing and Distress Inking Card Tutorial by Juliana Michaels featuring Bella Blvd Illustrated Faith Fly Free Stamp Set and Ranger Distress Inks

4.  Next, stamp your sentiment in Black ink. I recommend Ranger Archival Ink or a pigment ink.

5.  Sprinkle the entire image with clear embossing powder and heat set with your embossing gun.

Dual Embossing and Distress Inking Card Tutorial by Juliana Michaels featuring Bella Blvd Illustrated Faith Fly Free Stamp Set and Ranger Distress Inks

6.  Now the Distress Inking fun begins! Select several analogous colors - these are colors that are next to each other on the color wheel. These colors will blend together nicely without creating ugly browns. Apply the ink in a circular motion using a foam blending tool.

Dual Embossing and Distress Inking Card Tutorial by Juliana Michaels featuring Bella Blvd Illustrated Faith Fly Free Stamp Set and Ranger Distress Inks

Dual Embossing and Distress Inking Everything Beautiful Card by Juliana Michaels featuring Bella Blvd Illustrated Faith Fly Free Stamp Set and Ranger Distress Inks

7.  Take a small paint brush and splatter water onto the card. Dry the water with a paper towel.

Dual Embossing and Distress Inking Everything Beautiful Card by Juliana Michaels featuring Bella Blvd Illustrated Faith Fly Free Stamp Set and Ranger Distress Inks

8.  Die cut the card front using a stitched die cut. 

9.  Adhere the stamped panel to your card base.

Dual Embossing and Distress Inking Everything Beautiful Card by Juliana Michaels featuring Bella Blvd Illustrated Faith Fly Free Stamp Set and Ranger Distress Inks

Dual Embossing and Distress Inking Everything Beautiful Card by Juliana Michaels featuring Bella Blvd Illustrated Faith Fly Free Stamp Set and Ranger Distress Inks

I hope you enjoyed learning about Dual Embossing and Distress Inking. Now it's your turn to give this fun technique a try!

Dual Embossing and Distress Inking Everything Beautiful Card by Juliana Michaels featuring Bella Blvd Illustrated Faith Fly Free Stamp Set and Ranger Distress Inks

Blog Hop Details

If you're hopping along you should have arrived here from the blog of Jeanne Streiff. The next stop on the hop is Stephanie Buice. For those of you just joining the party, I've included the entire hop list below:

And now for the good stuff...Bella Blvd is having a giveaway! Make sure to leave a comment on each blog for your chance to win this awesome prize featuring some of their new Illustrated Faith products.


Happy Hopping!

Fall Coffee Lovers Blog Hop | Espresso Gratitude

So how are you all enjoying the Fall Coffee Lover's Blog Hop? I know I am. There are so many amazingly talented people in this world and so many coffee lovers too!

Today, I'm popping in to share my second card for the hop. This is actually a first for me. I usually only end up doing one card. However, I took some time this week to play around a little and this is what I came up with. Coloring is so good for the soul!

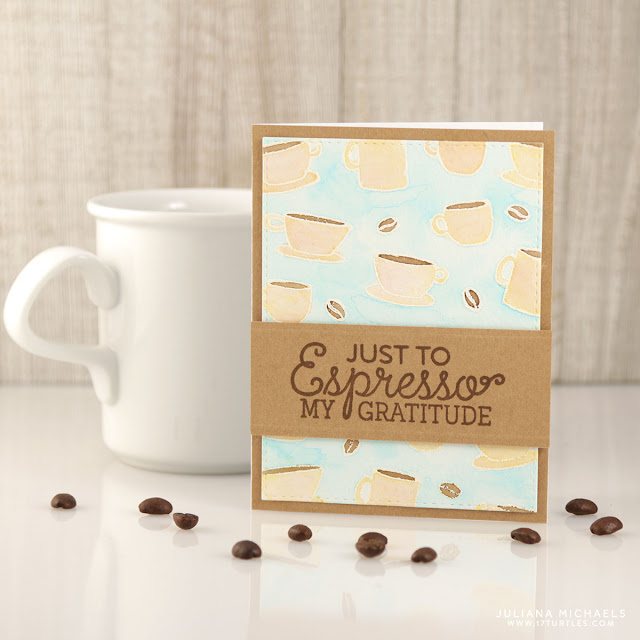
Espresso Gratitude Card by Juliana Michaels

The coffee cups and coffee beans are from the Jane's Doodles Coffee Time stamp set. I stamped the images onto watercolor paper using Versamark Embossing Ink. I then sprinkled them with white embossing powder and heat set them with my embossing gun. Next, I colored in the cups and background using Zig Clean Color Real Brush. I used Distress Ink as a watercolor to color the inside of the cups and the coffee beans.

Espresso Gratitude Card by Juliana Michaels

The sentiment is from My Favorite Things LLD Perk Up stamp set. I stamped it using Ranger Archival Ink in Espresso onto kraft cardstock. 

To add the embossed lines across the top and bottom of the sentiment panel, I used my Scor Pal. I simply scored the lines on the back side of the paper and then adhered it to the card front.

Thanks so much for stopping by today!

Halloween Apothecary Bottles | Halloween Printable Included

Hello all! Halloween is coming and I'm in full on Halloween decorating mode. Every year, I love to add to my decorations for our annual Halloween party and this year I wanted to create a set of Halloween Apothecary Bottles. I thought these would be perfect to go along with my costume this year - a witch! Keep reading to learn how to create your own Halloween Bottles and to download the free printable I created.

Halloween Apothecary Bottles from recycled glass jars by Juliana Michaels

1.  Begin by collecting glass jars from various food items - such as spaghetti sauce, jelly, etc. 
2.  Clean the jars and remove any labels using UnDu.
3.  Spray paint the lids with black spray paint and let dry.
4.  Print the Halloween Bottle Labels using the free printable you can download below.

Halloween Apothecary Bottles from recycled glass jars by Juliana Michaels

5.  Cut out the labels and apply Distress Ink using: Vintage Photo, Pumice Stone and Walnut Stain. Use a foam blending tool to blend the inks and give the labels a more distressed, vintage look.
6.  To adhere the labels to the jars, use Therm O Web Sticky Dots. Simply lay the label onto the adhesive, peel it up and stick it onto the jar.
7.  Repeat this for each label.

Halloween Apothecary Bottles from recycled glass jars by Juliana Michaels

Once you are finished with the labels, you are ready to fill your jars. Here are some ideas of various things you can use: 
  • Bat Wings - wing shapes cut from black cardstock and bent to give them a little dimension (you could also use plastic bats)
  • Bone Dust - Baby Powder
  • Bat Wings - Black craft feathers
  • Liquid, such as the Poison and Spider Venom, use food coloring or spray ink to dye the water in various colors


Halloween Apothecary Bottles from recycled glass jars by Juliana Michaels

Halloween Apothecary Bottles from recycled glass jars by Juliana Michaels

Free Printable | Halloween Bottle Labels

Halloween Apothecary Bottle Labels Free Printable by Juliana Michaels

I hope you enjoy using these Halloween Bottle Labels for your Halloween decorations. For another great idea on how to use a larger version of this file, check out the Halloween Home Decor project I created for the Therm O Web blog using their fabulous DecoFoil.

Halloween Apothecary Bottles created using recycled glass jars and free printable - Halloween Bottle Labels by Juliana Michaels 17turtles.com


Linked to
Show + Tell 236
Dishing It & Digging It Link Party #118

Fall Coffee Lovers Blog Hop | Pumpkin Spice Coffee Card Cut File Included

Hello Coffee Loving Friends and welcome to the Fall Coffee Lovers Blog Hop! I really look forward to this hop every season. The theme of this hop is of course Fall, and what says Fall more than Pumpkin Spice? With that idea in mind, I created a Pumpkin Spice Coffee Card Digital Cut File. I then used this cut file to create a card that I want to share with you today.  For more details about the hop make sure to check out the bottom of this post.

As I mentioned, this card uses a new digital cut file I created, which you can download below. I began by using my Silhouette Cameo to cut out all the images from cardstock. I assembled the coffee cup and used chipboard between some of the layers to give it a little more dimension. I then cut the fall leaves background from white cardstock. This piece is sized to measure 4 x 5.25", so it's perfect for layering onto a standard size card front.

Pumpkin Spice Coffee Card with Watercolor Distress Ink Die Cut Background by Juliana Michaels

Next, I had some fun with a piece of 4 x 5.25" watercolor paper.  Using my Ink Blending Tools, I applied and blended the following Distress Inks: Fired Brick, Spiced Marmalade, Mustard Seed and Peeled Paint. If you don't have Distress Inks, you could also create a similar look using watercolors. To add a little interest, I splattered some water onto the paper with a paint brush and dabbed it dry with a paper towel. I then adhered this piece behind the fall leaves die cut and attached it to the card front.

Pumpkin Spice Coffee Card with Watercolor Distress Ink Die Cut Background by Juliana Michaels

For the sentiment, I printed it onto a piece of cardstock, trimmed it to size and adhered it to the card front. I then attached the assembled coffee cup and my card was complete!

This card came together so quickly thanks to my Silhouette and some cardstock. Imagine all the fun fall color combos you could use to create your own version of this card. Happy coffee drinking and card making indeed!

Pumpkin Spice Coffee Card with Watercolor Distress Ink Die Cut Background by Juliana Michaels

Free Digital Cut File | Pumpkin Spice Coffee Card

This cut file includes everything you need to create your own Pumpkin Spice Coffee Card, including the fun sentiment, and everything is sized to fit on a standard 4.25 x 5.5 card.

Pumpkin Spice Coffee Card Free Digital Cut File by Juliana Michaels 17turtles

This free cut file can be used with a variety of electronic digital cutting machines, including the Silhouette Cameo and Cricut Explore. They can be used to create a full range of projects, including cards, gift wrap, tags, home decor, scrapbook pages and more. The only limit to what you can create using this cut file is your own imagination. This digital file is available in SVG, PNG, DXF and Studio formats and you may download this digital cut file for your own personal use. If you wish to use my cut files for more than your own personal projects, please contact me. If you have questions, concerns or comments about my digital cut files, please feel free to leave me a message in the comment section.
• • • • • • • • • • • • • • • • • • • •
Fall Coffee Lovers Blog Hop 2016

The Fall Coffee Lovers Blog Hop started today, September 23, and continues through September 30. All the fun begins on the Coffee Loving Cardmakers Blog, so make sure to stop by there and share your project. By linking up a newly created fall themed coffee, cocoa or tea project you are entered to win all kinds of awesome prizes from the Super Sponsors. Also, make sure to tag your projects on social media using #fall2016clh. I hope you'll play along and thanks so much for stopping by today!

• • • • • • • • • • • • • • • • • • • •

Click on the images/links to view more great Coffee themed Digital Cut Files and card ideas.


Coffee Cup Love Free Digital Cut File by Juliana Michaels 17turtles


Coffee Cup Shaker Card Free Digital Cut File by Juliana Michaels 17turtles


This card is linked to 

Halloween Spider Web Background Digital Cut Files

Hello my crafty friends! Today, I'm sharing a couple of new Halloween Digital Cut Files that include a large square background perfect for 12x12 scrapbook pages and a file that includes backgrounds for standard size A5 cards.  The card set also includes a couple of spiders that would be super fun to use with both files, so you may want both of them. Either file would be fun to back with a variety of patterned papers for a faboolous background, and the card shapes would be great to use for creating my favorite - shaker cards.

Free Digital Cut File | Halloween Spider Web Background

Halloween Spider Web Background Free Digital Cut File by Juliana Michaels 17turtles

Free Digital Cut File | Halloween Spider Web Card Background

Halloween Spider Web Card BackgroundFree Digital Cut File by Juliana Michaels 17turtles

This free cut file can be used with a variety of electronic digital cutting machines, including the Silhouette Cameo or Cricut Explore.  They can be used to create a full range of projects, including cards, home decor, scrapbook pages and more. The only limit to what you can create using this cut file is your own imagination. This digital file is available in SVG, PNG, DXF and Studio formats and you may download this digital cut file for your own personal use. If you have questions, concerns or comments about my free cut files, please feel free to leave me a message in the comment section or contact me on Facebook.

For more great Free Halloween Digital Cut Files check out my Free Digital Cut Files.  If you use any of my cut files, let me know.  I'd love to feature them here on my blog and social media. Happy crafting!

Happy Halloween Titles and Fonts with Digital Cut Files Included

I've had so many people enjoy my Christmas Titles and Fonts, as well as Christmas Titles and Fonts 2 I decided that it would be fun to create a Halloween version to share. I love Halloween and I love fonts, so why not share some of my favorites...right?

Just like the original Christmas Titles and Fonts and Christmas Titles and Fonts 2, you will find the link to the fonts I used below. Some of them are free and some of them are not free. For those of you who don't want to buy the fonts, I have you covered with a digital cut file I created that you can download and use with your electronic cutting machine.

Halloween Titles and Fonts by Juliana Michaels 17turtles

Free Fonts

Not Free


Free Digital Cut File | Halloween Titles

Halloween Titles Free Digital Cut Files by Juliana Michaels 17turtles

This free cut file can be used with a variety of electronic digital cutting machines, including the Silhouette Cameo and Cricut Explore. They can be used to create a full range of projects, including cards, gift wrap, tags, home decor, scrapbook pages and more. The only limit to what you can create using this cut file is your own imagination. This digital file is available in SVG, PNG, DXF and Studio formats and you may download this digital cut file for your own personal use. If you wish to use these for more than your own personal projects, please contact me. If you have questions, concerns or comments about my digital cut files, please feel free to leave me a message in the comment section.

If you are looking for more Halloween digital cut files, don't miss out on my Halloween Icons and Spider Webs.

Halloween Icons Free Digital Cut File by Juliana Michaels 17turtles

Spider Webs Free Digital Cut File by Juliana Michaels 17turtles

I hope you enjoy this Halloween titles and font share, as well as the digital download. Happy Halloween!

Happy Halloween Free Digital Cut Files

Halloween is coming and anyone that knows me, knows how much I love Halloween! It's one of my favorite holidays and I love to decorate my house for our annual Halloween costume party.

Today, I'm sharing a couple free Halloween digital cut files with you that I've used in some of my past projects. One of those projects are Halloween vinyl decorated mason jar glasses that first appeared on the SRM Stickers blog.

Halloween Mason Jar Drinking Glasses and Coasters decorated with adhesive vinyl and Silhouette Cameo by Juliana Michaels

To create these drinking glasses, I cut the design from black adhesive vinyl using my Silhouette Cameo and then adhered the image to the jar. I also created coordinating coasters using MDF coasters from my local craft store. I covered them with patterned vinyl and then added the Halloween icons. You could also use these cut files to create Halloween mason jar luminaries. Just add a battery lighted candle to the jar to create your own frightful DIY Halloween home decor.

Halloween Mason Jar Drinking Glasses and Coasters decorated with adhesive vinyl and Silhouette Cameo by Juliana Michaels

Free Digital Cut File | Halloween Icons

Halloween Icons Free Digital Cut File by Juliana Michaels 17turtles

Next up is a set of Spider Webs I used to create this Wicked Halloween scrapbook page. This first appeared on the Therm O Web blog where I share all the details on how I created this layout using Therm O Web Decofoil and Adhesives. 

Wicked Halloween Scrapbook Page by Juliana Michaels featuring Therm O Web Decofoil and Spider Webs Free Digital Cut File by Juliana Michael

Free Digital Cut File | Spider Webs

Spider Webs Halloween Free Digital Cut File by Juliana Michaels 17turtles

More Halloween inspiration will be coming your way soon, as I share some more great Halloween cut files. If you are looking for more Halloween inspiration, check out and follow my Halloween Ideas Pinterest board.

If you're looking for more great Halloween Digital cut files, check out my Halloween Titles and Fonts.
Halloween Titles Free Digital Cut File by Juliana Michaels 17turtles


Subscribe