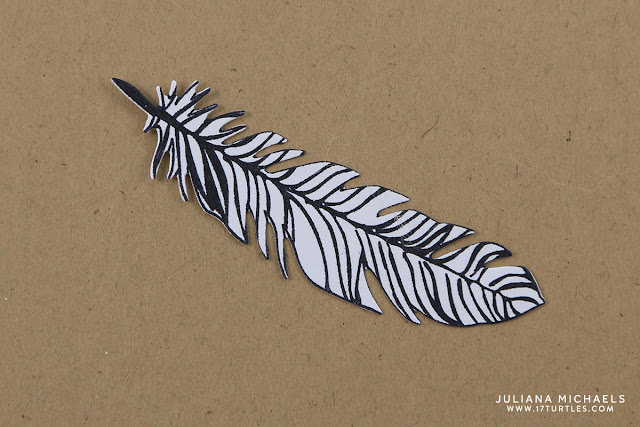
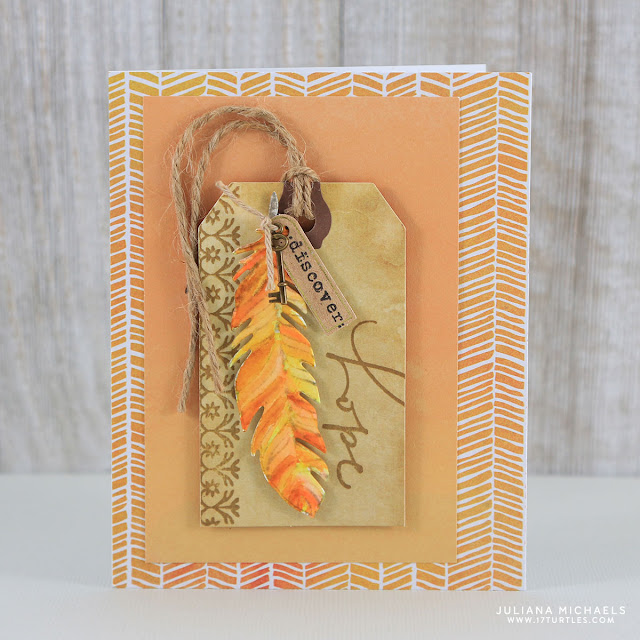
Hello all and welcome! Today I'm sharing how to line up your stamps and dies to create perfect die cuts for your cards. I created this trio of watercolored feather cards for the CardMaker Magazine and Momenta Blog Hop. All the fun blog hop details are listed below.
Are you interested in any of the products I used to create these cards? Click on the image below to check it out. Where available, I use affiliate links. If you make a purchase after clicking, this means I'll receive a small commission at no extra cost to you. Thanks so much for your support!
Momenta Art-C Mini Brass Keys
Momenta Art-C Large Tea-stained Tags
Momenta Art-C Kraft Mini Tag Pack
Patterned Paper Momenta
Tutorial | Lining Up Stamps and Dies
1. Die cut your shape from a piece of cardstock to create a template.
2. Position die over opening of die cut and adhere in place with a piece of washi tape or other low tack tape.
3. Adhere die in place so it can be raised up to allow you to see the die shape.
5. Stamp your image onto a piece of paper.
6. Place stamped image behind die cut opening and line up the stamp with the opening.
7. Use washi tape or other low tack tape to hold the stamped image in place.
8. Fold die over stamped image and run piece through die cutting machine.
9. Remove die cut and you are ready to color and use your perfectly stamped and die cut image.
Here is a close up of each card along with more details on how I created each one.
I used the Momenta Art-C Large Feathers Stamp and Die Set to create the feathers. I stamped each image using Ranger Distress Ink in Pumice Stone and then watercolored them using Zig Clean Color Real Brush Markers.
To embellish the cards, I stamped the small words using Ranger Archival Ink in Black onto the mini kraft tags. I then tied on one of the small brass keys and attached this to the feather. I used Therm O Web Foam Squares to attach the feathers to the tag for a bit of dimension.
The large tags are awesome as they are, but I decide to add a bit more interest to them by stamping the border along the left hand side and the sentiment using my MISTI and Ranger Distress Ink in Vintage Photo.
• • • • • • • • • • • • • • • • • • • • • • • •
Blog Hop Details
The blog hop officially starts on the CardMaker blog. If you're hopping along you should have arrived here from the blog of the talented Jeanne Streiff. After you leave here, your next stop is the amazing Daniela Dobson.
And now for the good stuff...Momenta is hosting a giveaway on their Facebook page! Make sure you visit for your chance to win a great prize package from them - Momenta Facebook Page.
• • • • • • • • • • • • • • • • • • • • • • • •
Are you interested in any of the products I used to create these cards? Click on the image below to check it out. Where available, I use affiliate links. If you make a purchase after clicking, this means I'll receive a small commission at no extra cost to you. Thanks so much for your support!
Momenta Art-C Large Tea-stained Tags
Momenta Art-C Kraft Mini Tag Pack
Patterned Paper Momenta


Your cards are BEAUTIFUL! Also, the tutorial is great!
ReplyDeleteOh my goodness! I need this stamp and die! Just gorgeous! Love how you used it!
ReplyDeleteThank you so much for sharing this! Some of us are just beginners and it's great to see the process by a PRO!
ReplyDeleteI'm loving how you layered the tags with stamped images, the feathers, etc!
ReplyDeleteGorgeous set!!
ReplyDeleteThese are all gorgeous! Love the feathers and your pretty color combos!
ReplyDeleteBeautiful! Great colors. Thanks for sharing how you stamped and die cut feathers.
ReplyDeleteBeautiful cards and the color combinations are beautiful.
ReplyDeleteBeautiful projects. Thank you for sharing them
ReplyDeleteKathleen