Roller Stamped Background + CardMaker and Plus Corporation Blog Hop

Hello all and welcome! Today's post is all about how to create a roller stamped background for your cards as part of the CardMaker Magazine and Plus Corp of America Blog Hop.  Make sure you check out all the blog hop details below.

Roller Stamp Background Card Set by Juliana Michaels featuring PLUS Corporation Roller Stamp and Simple Stories Carpe Diem

As part of the blog hop, I created a video to share with you about how to create a stamped background using the fabulous Decoration Roller Stamps from Plus America. These are a new-to-me product and I have to say, they were really fun to play and create with! These stamps have a self-inking cartridge which allows you to apply a pattern by simple rolling it on the paper. I used their new Numbers roller stamp to create my cards.


Here is the template I created and mention in the video. I used this template to help line up the roller stamp and create nice straight stamped lines. Feel free to download it for your own personal use. 


Roller Stamp Background Card Set by Juliana Michaels featuring PLUS Corporation Roller Stamp and Simple Stories Carpe Diem

Once I got down the process on how to create the background, I decided to go ahead and create a set of cards. One can never have too many cards right?
Roller Stamp Background Card Set by Juliana Michaels featuring PLUS Corporation Roller Stamp and Simple Stories Carpe Diem

I used Simple Stories Carpe Diem 3x4 Journaling Card Elements and 6x6 Paper Pad to create the cards. I matted the 3x4 card on a piece of black cardstock before mounting it on the roller stamped background.

Roller Stamp Background Card Set by Juliana Michaels featuring PLUS Corporation Roller Stamp and Simple Stories Carpe Diem

I created the simple sentiments using a Dymo Label Maker. I then finished them off with some self adhesive sequins from Jillibean Soup, because you know every card deserves a little bling!

Roller Stamp Background Card Set by Juliana Michaels featuring PLUS Corporation Roller Stamp and Simple Stories Carpe Diem

BLOG HOP DETAILS & GIVEAWAY

The next stop on the hop is the talented Catherine Scanlon, but in case you are just joining the party, I've included the entire hop list below:


Plus Corp is hosting a giveaway on their Facebook page,  so make sure you head on over there for details on how to enter for a chance to win. This awesome prize package includes some of their Decoration Roller Stamps, along with some of their other great products. Here's a peek at what you can win!

Plus Corporation Blog Hop Giveaway

Are you interested in any of the products I used for the card set I shared with you today? Just click on the image below to check it out. Where available, I use affiliate links. If you make a purchase after clicking, this means I'll receive a small commission at no extra cost to you. Thanks so much for your support!


My Creative Space and Craft Supply Storage

Hello friends! Today I'm sharing my full creative space over on the CardMaker Magazine Blog, and I thought it would be fun to share here on my blog about specific storage ideas for craft supplies. This includes embellishments, stamps, dies, ink pads, twine, spray ink, paint and more.  I love to organize things and I especially enjoy keeping my craft supplies neat and orderly. Over the years, I've developed a few tricks that help me stay on top of my stash of scrapbooking and card making supplies.
  • Purge and purge often. Seriously. I purge at least every 6 months. I go through my products and pull out things that I haven't used. They get put into a giveaway pile and I donate them to the local thrift stores and schools. I also give stuff away to friends and family who enjoy this hobby.
  • Clean up after each project. I tend to work best when I don't have a lot of clutter around. This is also why I tend to purge so often.  That's not to say that I can't make a mess, because I certainly can. However, I always put things back in their place when I'm finished. My space is then ready to go the next time I sit down to create.
  • Use open storage or clear containers/drawers. I have found that if I can see it, I am 10 times more likely to use it. If it's hidden away, I forget about it and then guess what happens in 6 months? It ends up in the giveaway pile!
Scrapbook and card making storage ideas - Juliana Michaels of 17turtles shares her creative space and craft supply storage

Here are some of my favorite storage containers. First up are these fabulous wood boxes that look like drawers. I picked these up several years ago from Hobby Lobby and I seriously love them. They are perfect for holding embellishments, stamps, dies, embossing folders, 6x6 paper pads and more. Unfortunately, they aren't available anymore, but I think it could be fun to make your own using old dresser drawers, paint and fun knobs to match your decor! There are lots of great options out there. Just keep your eyes open for fun containers that are at least 6 inches wide and then most of your products will fit inside.

Scrapbook and card making storage ideas - Juliana Michaels of 17turtles shares her creative space and craft supply storage

Many people use the clear refrigerator storage bins, and of course those work great and are probably a little less expensive, however I think these are so much prettier to look at.  Don't you agree?!

Scrapbook and card making storage ideas - Juliana Michaels of 17turtles shares her creative space and craft supply storage

For my stamps and dies, I love the Clear Pocket Storage by MFT Stamps. I used to keep my stamps and dies in their original packaging, however since I've started doing more card making I was starting to tear the packages. I knew I needed a better solution and so far this is working really well for me.

Scrapbook and card making storage ideas - Juliana Michaels of 17turtles shares her creative space and craft supply storage

Another type of storage that I like to use are Sterilite Modular drawers and small Sterilite storage baskets. The drawers hold 2 of these baskets. I love that it lets me keep like things together and I can easily take the basket out of the drawer and over to my craft table to create. Currently, I have my ink pads in these drawers, but I'm quickly starting to realize I'm going to need a new system as my card making supplies continue to grow! I'm not sure what I'll do, but once I switch over, I'll have to share with you and if you have any suggestions, I'd love to hear them.


This same basket and drawer system also works well for my twine and ribbon.

Scrapbook and card making storage ideas - Juliana Michaels of 17turtles shares her creative space and craft supply storage

Recently I came across this Darice Bead Container (on the left) that works great for my sequins. It has 24 little canisters that allow me to keep all of my colors separated and I can just flip open the top to easily shake out the sequins I want to use for my project. On the right are Artbin Twisterz. They work great for secure storage and they even stack. However, because they are round, they take up a lot of space in my baskets. 

Scrapbook and card making storage ideas - Juliana Michaels of 17turtles shares her creative space and craft supply storage

This Akro-Mils Plastic Storage Case has separate compartments that are great for small embellishments such as wood veneer, flair, buttons, brads and more. I have several of them and I use each one to store a different type of embellishment. The lid snaps closed securely and I love that I can remove the dividers to make the compartments larger if needed.

Scrapbook and card making storage ideas - Juliana Michaels of 17turtles shares her creative space and craft supply storage

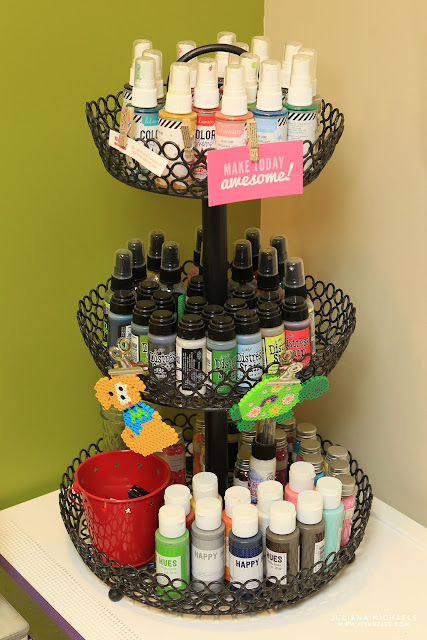
Last, but not least, I use a cupcake stand to store my spray ink and paint. I love the rainbow of color it adds to my creative space!

Scrapbook and card making storage ideas - Juliana Michaels of 17turtles shares her creative space and craft supply storage

I hoped you learned some fun new storage ideas today. If you're interested in seeing a full view of my creative space and more craft room ideas, I invite you to head over to the CardMaker Magazine Blog. Each day this week they'll be sharing the creative spaces of each of the new design team members, so I'm sure you'll find loads of great ideas with each visit!

Are you interested in any of the storage ideas I shared with you today? Just click on the image below to check it out. Where available, I use affiliate links.  If you make a purchase after clicking, this means I'll receive a small commission at no extra cost to you. Thanks so much for your support!


Watercolor and Stencil Embossed Background

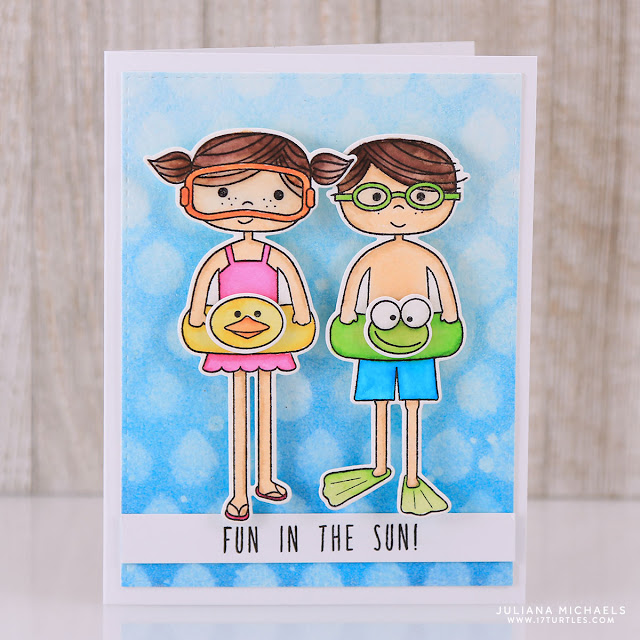
I'm playing along with the Simon Says Stamp Wednesday Challenge Photo Inspiration. They post up a fabulous new challenge each Wednesday and the winner receives a $50 Simon Says gift voucher! The inspiration photo screamed summer, beach and water to me, so I immediately pulled out my Simon Says Happy Swimmers stamp and die set and started playing. 

Fun In The Sun Summer Pool Party Card by Juliana Michaels featuring Simons Says Stamps Pool Party stamp set, watercoloring and stencil embossed background technique

I began by stamping the swimmer girl and boy onto watercolor paper. I colored them with my Zig markers and then blended the color with water and a small paint brush. To give the adorable little swimmer's googles a more realistic look, I added some Glossy Accents.


The really fun part though, was the creating the background. It took me a few tries to get the look I was going for, but I finally got it to work. I began with a piece of watercolor paper and used temporary adhesive to hold it in place on my craft mat. Using a Ranger Mini Round Ink Blending Tool,  I applied various colors of blue Distress Ink to the paper. I started with the lightest color and then added progressively darker colors with more color applied at the bottom, than at the top, of the paper.

I then placed a stencil over the top of the colored paper and used washi tape to hold it in place. I lightly spritzed a paper towel with water and then held the wet paper towel over the openings on the stencil to remove some of the ink. Make sure you don't use too much water or it will get under the stencil and remove too much ink. I then removed the stencil and splattered some water onto the background with a large paint brush. I gently removed the excess water with a paper towel. This step removes ink as well. Next, I applied clear embossing powder to the entire piece of paper and heat embossed it. Not all of the powder will end up sticking, but I love the effect it achieved. I thought it added a nice water like element to the background for my little swimmers.


I had a blast playing along with this challenge. I just wish I had more time to play along with challenges like this. So what is your favorite challenge blog?


Fun In The Sun Card Supplies: Here is a list of some of the supplies I used on this card. Where available I use affiliate links on the products I purchase and use. This means that if you make a purchase after clicking, I will receive a small commission at no extra cost to you. Thanks so much for your support!


Subscribe