You Are My Sunshine Card

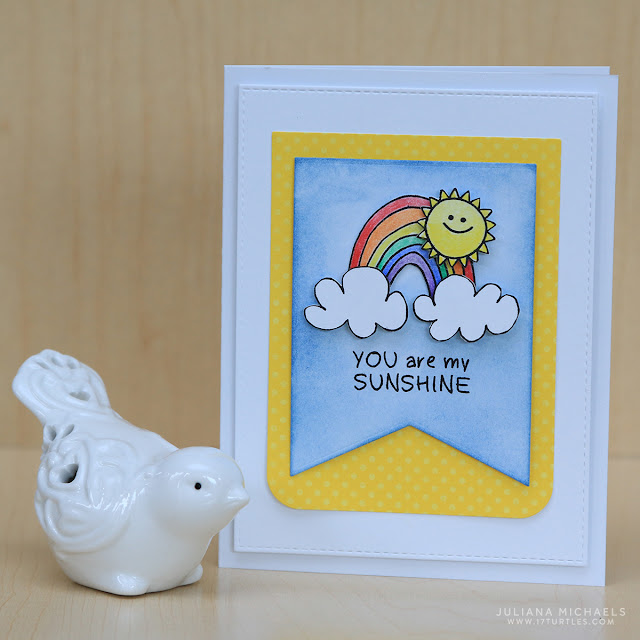
Hi all! Today I'm sharing a new card I created for the Simon Says Stamp Wednesday Challenge - Come Rain Or Shine. For this challenge, they wanted to see projects that focused on rainy days, sunny days, or both! I decided to focus on the in-between with a rainbow and some sunshine. I used SRM Stickers - Jane's Doodles Rain or Shine Clear Stamp Set. Seriously the perfect stamp set for this challenge!

You Are My Sunshine Card by Juliana Michaels featuring SRM Stickers Jane's Doodles Rain Or Shine Clear Stamps

I stamped all of the images on white cardstock with my MISTI, colored them with colored pencils and then fussy cut each one. I used MFT Stamps Blueprints Die to cut the banner and then applied Distress Ink with a blending tool to create the "sky" for my rainbow scene. For added dimension, I used double sided foam adhesive to adhere the sun and clouds.


To see more inspiration using the Rain or Shine stamp set check out the card I created for Spring Coffee Lovers Blog Hop.


You Are My Sunshine Card Supplies:
You can find links below to the supplies I’ve used by clicking on the image or text. This will take you directly to the product. Where available I use affiliate links. This means that if you make a purchase I will receive a small commission at no extra cost to you. I truly appreciate your support.
Happy Easter and Spring | Digital Cut Files

Hello and Happy Easter everyone! Yes, I know it was yesterday, but I thought I would continue the celebration by sharing some Easter and Spring themed digital cut files with you. These cut files will be perfect for scrapping all those great Easter photos you took this weekend! I'm also sharing a few scrapbook pages and paper craft project ideas to inspire you. 

Digital Cut File | Easter Chicks

Easter Chicks Free Digital Cut File by Juliana Michaels 17turtles.com

Happy Easter card and gift bag featuring Easter Chicks Free Digital Cut File by Juliana Michaels 17turtles.com


Happy Easter Scrapbook page featuring Easter Chicks Free Digital Cut File by Juliana Michaels 17turtles.com


Digital Cut File | Eggcellent Adventure

Eggcellent Adventure Free Digital Cut File by Juliana Michaels 17turtles.com

Hoppy Happy Easter Scrapbook Page featuring Eggcellent Adventure Free Digital Cut File by Juliana Michaels


 Digital Cut File | Spring Flowers

Spring Flowers Free Digital Cut File by Juliana Michaels 17turtles.com

These free cut files can be used for a full range of projects, including cards, home decor, scrapbook pages and more. These digital files are available in SVG, PNG, DXF and Studio formats and you may download this digital cut file for FREE for your own personal use. Please refer to my terms of use for more information if you wish to use these for more than your own personal projects.

Lastly, if you are looking for another great Easter digital cut file, check out the Spring 2016 Issue of Scrapbook and Cards Today. I have an Easter Bunny cut file available for you to download. Make sure to scroll all the way down to the bottom of the page to find it.

Easter Bunny Free Digital Cut File by Juliana Michaels featured in Spring 2016 Issue of Scrapbook and Cards Today

Thanks for stopping by today and make sure you print those Easter photos and scrapbook all of those egg-cellent memories!

Spring Coffee Lovers Blog Hop Winner

Congratulations to the Diana, the winner of the blog candy from the Spring Coffee Lovers Blog Hop! I have sent you an email to get your address. Thank you to everyone who visited during the hop and for all of your sweet comments. It was another fantastic hop!

Thanks A Latte | Spring Coffee Lovers Blog Hop

I hope you all have been enjoying the Spring Coffee Lovers Blog Hop! I know I certainly have. So many yummy, awesome, coffee themed cards...it makes my heart happy! 

Today, I'm sharing a Thanks A Latte Shaker Card I made using the Jane's Doodles Coffee Time stamp set.


I used the Watercolor with White Embossing Powder and Distress Inks technique to stamp and color in the images. This is by far one of my favorite ways to color in my stamped images. I stamped the images with a clear Versamark ink pad onto water color paper.  I then heat embossed the images with white embossing powder and watercolored them using Distress Inks and some watercolors.

Thanks A Latte Shaker Card by Juliana Michaels featuring Jane's Doodles Coffee Time Stamp Set

Thanks A Latte Shaker Card by Juliana Michaels featuring Jane's Doodles Coffee Time Stamp Set

If you happened to miss it, I also shared a Rain or Shine Coffee themed card on my blog along with some blog candy that is still up for grabs until Friday, March 25. On that post, you also check out more details about the Spring Coffee Lovers Blog Hop and all the fun involved with hopping and /or playing along.

Also linked up to the: Simon Says Stamp Monday Challenge Blog - Challenge: Food and Drink

Supplies:
You can find links to the supplies I’ve used below by clicking on the image or text. This will take you directly to the product. Where available I use affiliate links. This means that if you make a purchase I will receive a small commission at no extra cost to you. I truly appreciate your support.


DIY Wooden Easter Decor

Easter is this coming weekend, so I decided it was time to get crafty and make some DIY Wooden Easter Decor that includes some adorable wooden bunnies and eggs.

DIY Wooden Easter Decor by Juliana Michaels | 17turtles

I began by gathering my supplies which included some wooden eggs and bunnies from Hobby Lobby, along with chalk paint, cream wax and a paint brush. For a complete list of supplies, please see below.


Before I started painting the bunnies, I decide to add some texture to them using Gel Medium Heavy Gel. I happened to have Gloss, but Matte would work just fine. I used a spatula to apply a thick layer of the gel medium to both of the wooden bunnies.


As you can see, I put it on rather thick and made sure it was not smooth to help give it more texture.


After the gel medium was dry, I painted the bunny with the Everlasting (White) Chalk Paint. When the paint dried, I noticed that it had a cracked appearance. This was a nice surprise and I loved how it added even more texture to them. I ended up applying two coats of paint. 


After the paint was dry, I applied the Cream Wax with a foam brush and wiped away the excess with a rag. I love the wonderful antiqued feel the Deep Brown wax added!


To finish off the bunnies, I added eyes and noses using adhesive black pearls and a crinkled seam binding bow!

DIY Wooden Easter Decor by Juliana Michaels | 17turtles

I painted each of the eggs a different color of the chalk paint. I mixed the Romance (Red) with Everlasting (White) to get the soft pink color. After the paint was dry, I applied the cream wax with a foam brush. I then wiped off the excess and buffed them using a rag. The eggs seemed too plain with just a coat of paint, so I decided to dress them up using some ric rac ribbon from my stash. It was originally white, so I used Tim Holtz distress ink and a foam applicator to add some color to them.


To adhered the ribbon to the wooden egg, I used Therm O Web's iCraft Super Tape.


Now, my home is ready for Easter thanks to this cute DIY Wooden Easter Decor!


Supplies:
You can find links to the supplies I’ve used below by clicking on the image. This will take you directly to the product. Where available I use affiliate links. This means that if you make a purchase I will receive a small commission at no extra cost to you. I truly appreciate your support.
Subscribe