I hope your holidays are off to a good start. My December has started off busy as always, but I found the time to create a set of Star Christmas Gift Tags perfect for dressing up a gift bag or present.
These tags are easy to create with only a few simple tools and will add a wonderfully festive and homemade feel to all of your gifts this year. If you are interested in creating a coordinating gift bag for these tags, please head over to the Pebbles blog where you will find my Star Christmas Gift Bag Tutorial.
Begin by gathering your supplies. As you can see in my photo, there are quite a few different Photo Hang Tags or Frames to choose from. I used the smaller sized frames that are part of the set. Most of them are neutral in color and pattern so they are perfect for this project. Remove the twine that comes with the frames before you start.
Cut a piece of Leaf Chevron patterned paper to 2 x 2.5" to fill the "window" of the frame.
Adhere the patterned paper to the back side of the frame.
Cut a piece of POW! Gold Glitter paper to 3 x 3.5" and center it inside the Knock Out Border Punch using the Mini Stars Border.
Punch the star border.
Apply Xyron Double Sided High Tack Tape to the back side of the frame piece and adhere it to the punched gold glitter paper piece.
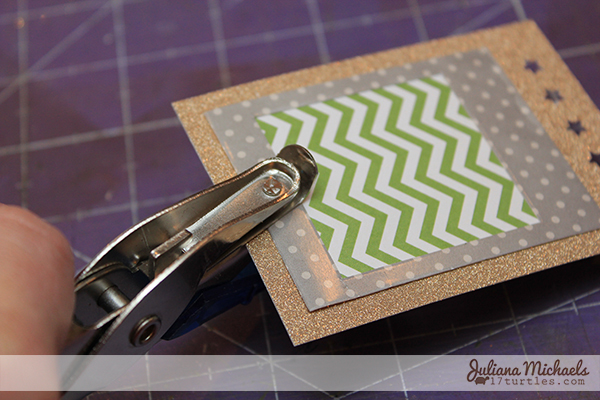
Punch a hole through the gold glitter paper using a 1/8" hole punch. Line up the punch with the existing hole in the Photo Tag/Frame.
Run a 12" length of ribbon through the punched hole creating a loop.
Pull the ends through the loop.
Tighten the loop. The extra length of ribbon can be used to tie your tag to a gift bag or other present as desired.
I knew I wanted to add a sentiment to the front of my tag and I loved that some of the ribbon in the Peppermint Express Ribbon Set was printed with the words "Merry Christmas". When I saw this ribbon, it gave me the idea to cut the ribbon and use it as my sentiment. I cut the ribbon in an inverted "V" shape on one end and then in a "V" shape on the other to cut out the sentiment.
Use Xyron Adhesive Dots to adhere the ribbon to the front of the tag.
I only had 3/8" Dots, so I cut them in half using my Tonic Studios Tim Holtz Craft Scissors. These are seriously the best scissors for cutting anything with adhesive because it won't stick to the blades.
Complete the tag by adding a Peppermint Express Dimensional Star sticker to the center of the frame and your tag is ready to use. Repeat this process with the other Photo Tags/Frames and the Rouge Chevron paper. To add the small gold star you see in the photo below, punch a small gold star from the gold glitter paper and adhere it to the center of the Star sticker using Xyron Adhesive Dots.
I hope you enjoyed today's tutorial and are inspired to create your own set of tags to decorate your Christmas gifts this year. As I mentioned above, if you are interested in creating a coordinating gift bag, head over to the Pebbles Blog for my Star Christmas Bag Tutorial.
SUPPLIES
Frames: Pebbles Front Porch Photo Hang TagsPatterned Paper: Pebbles Basics 12 x 12 Leaf Chevron and Rouge Chevron
Stickers: American Crafts Peppermint Express Remarks Dimensional Adhesive Stars
Ribbon: American Crafts Peppermint Express Value Pack Premium Ribbon
Cardstock: American Crafts POW! Glitter Paper 12 x12 Gold
Punch: American Crafts Knock Outs Border Punch Mini Stars, 1/8" Hole Punch
Scissors: Tonic Studios Tim Holtz Craft Scissors
Paper Trimmer: Tonic Studios 12" Small Base Trimmer
Adhesive: Xyron Mega Runner, Xyron 3/8" Dots, Xyron 1/2" Double Sided Tape
LINKED:
The Pin Junkie Friday Link Party #46
Tatertots & Jello


these are so cute and add a sweet touch to the festive season
ReplyDeleteWow wow wow!! These are gorgeous!!! I loveeeeee those stars!!!!!!!
ReplyDeleteawesome tags!!!
ReplyDeleteLove these Juliana!
ReplyDeleteHi Juliana,
ReplyDeleteI love the tags, they are beautiful, and how to go about making them, that is really fantastic, thank you so much.
I am following in all ways I can from a brand new blog.
I hope that you have a wonderful day.
Love and best wishes.
Anne
Love your festive tags! So shiny and bright! Perfect for holiday gift giving!
ReplyDeleteWonderful tutorial, Juliana. Such great directions and photos. Love these pretty tags!
ReplyDeleteThese tags are fab Juliana, and the AC stars look awesome on the front!! Love them!
ReplyDelete