SRM Stickers Calendar Creations | Layout

I am up on the SRM Stickers blog today with a fun layout I created using their Tiny Calendar Stickers! Yes, I layout using calendars!!!

I was initially inspired for the idea of using the tiny calendars on a layout when I was trying to come up ideas for using the SRM Calendar Stickers back in July.  I decided to create the more traditional calendar project for my first SRM Stickers project, but I knew this idea would have to be used at some point on a future layout.

TRENDS | Centered Design
I have been noticing a lot of layouts lately where the main elements are centered vertically and run from the top to the bottom of the layout. I found it an easy way to create and it worked well to display the row of mini calendars both above and below my grouping of photos.

SRM Stickers Calendar Stickers Every Day Layout by Juliana Michaels

SRM Stickers Calendar Stickers Every Day Layout by Juliana Michaels

TECHNIQUE | Pen Lines
A simple technique, but it adds a bit of a hand drawn feel to a layout. I also love adding borders and framing things, so the addition of some pen work helped frame the photos. I prefer to use a metal edged ruler and I placed it on top of my layout where I wanted the lines and I ran my pen along the edge. It makes them perfectly straight, especially if you are using the ruler on a magnetic and ruled cutting mat. ( I use the We R Memory Keepers cutting mat.)

SUPPLIES:

Other Supplies:
Patterned Paper and Cardstock Stickers: Echo Park Hello Beautiful

SRM Sticker Calendar Stickers Every Day Layout by Juliana Michaels

I love when you come by for a visit and I can't wait until next time! And please make sure that I know how to visit you too!!!

Here Comes the Bride

I recently attended my niece's wedding and of course I took a ton of photos. I have finally gotten most of the wedding photos scrapped, but this does not include the photos I took after the wedding and at the reception. Those will come later! For now, I thought I would share another layout I created using a mix of scrappy goodness from SRM Stickers and Bella Blvd.

INSPIRATION | Large background shapes
As I was putting this layout together, the idea of having a large heart in the background filled with some patterns or other shapes came to mind. Amazingly, I did not use my Silhouette to create the heart! I did it the old fashioned way and traced it on a scrap of paper and cut it out by hand. I saved the inside negative and offset it to the side and then filled the inside with cardstock doilies, chipboard shapes, enamel dots, jewels and stickers!

Here Comes the Bride Layout by Juliana Michaels

Here Comes the Bride Layout by Juliana Michaels detail

TIPS | Chipboard Treatments and Sticker Borders
To color the chipboard pink, I simply painted them with pink acrylic paint. The white lacy heart shape was painted with a paint pen. Nothing fancy, but I think the dark pink adds a nice pop of color to the design.
The lace looking border was created by using two sheets of SRM Stickers Fancy Sticker Sentiments - Love. I took the border stickers from them and placed them around the outside edge of the layout. I had to do some trimming here and there, but it fit just perfectly because of the two small stickers I had overlapping the edges.

Here Comes the Bride Layout by Juliana Michaels detail

SUPPLIES | Bella Blvd, SRM Stickers, My Mind's Eye, BoBunny
Patterned Paper: Bella Blvd/ Love & Marriage, Freestyle Sophisticates
Stickers: SRM Stickers/ Fancy Sticker Sentiments - Love; Bella Blvd/ Love & Marriage
Enamel Dots: My Mind's Eye
Jewels: BoBunny

Other: 
Chipboard hearts and cardstock doilies: Unknown
Acrylic Paint: Folk Art by Plaid in Pink Melon
Paint Marker: Elmer's Painters in White
Sewing Machine: Kenmore

Do you like to scrap wedding photos? I do because they bring me back to my wedding day nearly 8 years ago this coming September. Makes me want to scrap some of them again! ;)

P.S. Did you see that Bella Blvd is having a Design Team Call?! You can stop by the Bella Blvd blog for all of the details! I have loved being an Ongoing Guest Designer with them this past year! They are a wonderful company to design for and I want to thank them for having me as part of their "team" this past year!

Pie Chart Love | Free Cut File

It's been awhile since I shared a free cut file, so I thought today might be a good day to do so. I originally created this Pie Chart Love cutting file for the Oklahoma Online Benefit Crop back in May to benefit the victims of the tornadoes.  I have since added to the cut file and created two versions of it. I used the outline version of it on the layout I am sharing today.

Sometimes it is wonderful to scrap everyday photos. In fact, I took this one with my camera phone. I was at one point trying to take a photo every day, but I have since fallen off that wagon. I started missing days this summer and when I was on vacation I didn't even have my phone turned on. Maybe, I'll start it back up again though. Who knows...

Love To Read Layout by Juliana Michaels using Pie Chart Love Digital Cut File

Love To Read Layout by Juliana Michaels using Pie Chart Love Digital Cut File

Love To Read Layout by Juliana Michaels using Pie Chart Love Digital Cut File

Love To Read Layout by Juliana Michaels using Pie Chart Love Digital Cut File

FREE DIGITAL CUTTING FILE | Pie Chart Love

You can download it and use it for FREE. I just ask that you let me know if you have used it and it would be awesome if you would link up to my site if you use it or share it. I would love to see how it inspires you!  As you will notice, the pie chart on the left is going to cut an outline shape, like the one in my layout above. The one on the right will cut a more solid, stencil shape.

PIE CHART LOVE

Pie Chart Love Free Digital Cut File by Juliana Michaels

SUPPLIES | My Mind's Eye, Teresa Collins, Webster's Pages
Patterned Paper: My Mind's Eye, Teresa Collins, Webster's Pages
Cardstock: American Crafts
Stickers: Webster's Pages
Jewels: BoBunny
Punch: EK Success
Digital Cutting File: Juliana Michaels
Digital Cutting Machine: Silhouette Cameo


Thanks so much for stopping by and I hope you enjoyed my layout and the digital cutting file that I share with you!

Paper Bakery Sketch Challenge 11

Just a quick post today to share the new sketch for the Paper Bakery Sketch Challenge. We are up to Sketch Challenge 11 already! My how time flies when you are having fun!


Here is a sneak peek at the layout I created from the sketch using the August Hello You Scrapbook Kit.  I'd love for you to stop by the Paper Bakery blog and check out my layout!


Thanks for stopping by today and I hope you will join us and play along with the Paper Bakery's Sketch Challenge for you chance to win a $10 gift card to their shop!

My Favorite Things August Scrap Guest Designer | Part 2

It has been so much fun sharing my creations using My Favorite Things with you and I want to give a special shout out to Laina Lamb for making this all possible! Thank you so much Laina!!! I have always loved her design style and the stamps and dies she has been creating for My Favorite Things are right up my alley!

The layout I am sharing with you today is just an everyday photo...in fact it is a selfie I took of myself during a day of working hard in the yard of our new home this spring. I felt so happy and content and I wanted to capture that moment and feeling!

INSPIRED BY | The Products
I know I said it in my last post for My Favorite Things, but products seriously inspire me to get crafty and creative. It happened again on this layout when I saw the Feathers and Arrows die and Mod Border stamps. I knew I just had to use them and then I realized as I was pulling out the stamps that the zig zag stamp would stamp perfectly on the feathers to make them look more "real". The red cardstock that I used for the title and on the arrows from the Feathers and Arrow die set help bring your eye around the photo from the title to the embellishment cluster on the bottom right.

Remember Happy Layout by Juliana Michaels using My Favorite Things Dies and Stamps

TRENDS | Feathers
I will admit, I was a little slow to this trend, but I love the organic look they can add to a design. And with the style of these dies and stamps, they also lend a rather graphic feel as well.

Remember Happy Layout by Juliana Michaels using My Favorite Things Dies and Stamps

Remember Happy Layout by Juliana Michaels using My Favorite Things Dies and Stamps

TECHNIQUE | Stenciling
I used on of the My Favorite Things Concentric Circles stencil to "dress up" my background paper a little. I positioned the stencil on the paper and then inked it using a gray ink pad and a sponge dauber. I feel like it helps to slightly soften all of the straight lines and edges in the rest of the design.

SUPPLIES | My Favorite Things
Stamps: Laina Lamb Designs/ Border It - Mod Borders

Other:
Patterned Paper: Jillibean Soup/ Happy Camper, Soup Staples II
Twine: The Twinery
Flair: Paper Bakery
Enamel Dots: My Mind's Eye
Cardstock: American Crafts

Thank you so much for stopping by to see my layout and what I created using the fabulous My Favorite Things products!!! Hope to see you again soon!!!

Paper Bakery August Hello You Scrapbook Kit

I am up on the Paper Bakery blog today sharing a layout I created with the August Hello You Scrapbook Kit.  Make sure to stop by for some fun and simple tips you can use when creating your next scrapbook layout or project.

Blowing Bubbles Layout by Juliana Michaels for Paper Bakery

You will also see that I used some flair from one of their new EXCLUSIVE Flair Sets called Oh Yeah!
Paper Bakery Oh Yeah Flair Set

Thanks for stopping by today and make sure you visit the Paper Bakery Shop for all your kit and scrapbooking needs!!!

BoBunny Zip-A-Dee-Doodle | Working with Busy Patterned Papers and Color

Have you seen BoBunny's newest collection Zip-A-Dee-Doodle? It is full of fun, whimsical doodles such as flowers, paisleys, banners, stripes, numbers and more. It totally reminds me of all the doodling I used to do in my high school notebooks!

INSPIRED BY | Triadic Color Scheme
First off, every piece of paper in this collection has one side that is black and white. This is one of my favorite things about this collection, because it makes these papers perfect for adding your own touch of color to go with your photos or project! When I created my layout for the BoBunny blog using the Zip-A-Dee-Doodle collection I did just that and added my own touches of color. I was inspired to use a what you could call a Triadic Color Scheme because of the red in my Mom's shirt and the blue/green color in the patterned paper. I then selected yellow as my accent color to help tie the red and blue/green together.

If you are interested in learning more about color theory, here are a couple of links:
Color Theory Tips for Web Design
Basic Color Theory

TIP | How to Work with Busy Patterned Paper
Many of you will look at this collection and immediately see how busy the patterns are on all of the papers and it might intimidate you at first. I want to give you some tips that may help you look at this collection in an entirely new light.

To start with, I began by looking through my photos. I knew from how "busy" the papers are that I would need some "bold" photos to stand out against the papers. I chose 3 photos of my Mom wearing a red shirt.  The red seemed to stand out against the blue/green colors in some of the patterned papers.

I then laid out all the papers to take a good look at the patterns, specifically their color and the scale of the pattern on each paper.  I choose to use only one piece of the colored patterns (green) and then one of the black and white patterns as my background. Can you see how selectively using only 1-2 papers narrows the scope and makes them easier to work with? You really don't need to use all of the patterns on one layout!

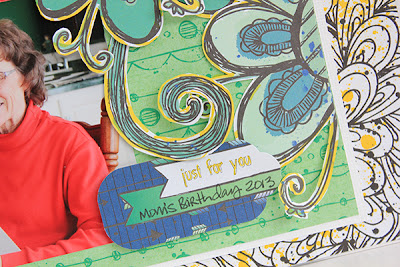
Birthday Wishes Layout by Juliana Michaels for Bo Bunny

Birthday Wishes Layout detail by Juliana Michaels for Bo Bunny

TECHNIQUE | Dylusions Spray Ink and Markers
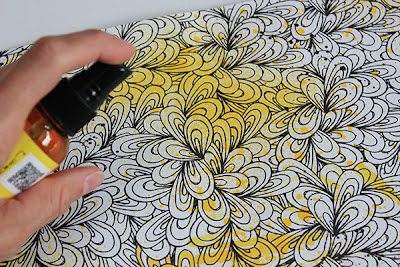
A simple way to add color to the Zip-A-Dee-Doodle papers is using a spray ink or markers. As I mentioned above, I choose to use yellow to compliment the red and blue/green colors I had already selected in my photos and papers. On the black and white pattern that I chose for my background, I added color to it my lightly spritzing it with Dylusions Spray Ink in Lemon Zest.

Using Dylusions Spray Ink with Bo Bunny Zip-A-Dee-Doodle Collection

Using Dylusions Spray Ink with Bo Bunny Zip-A-Dee-Doodle Collection

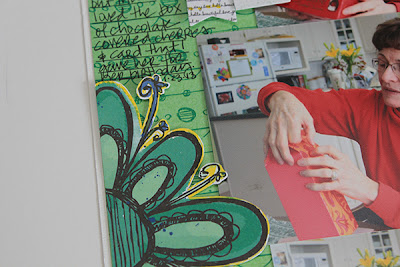
To add the color around my fussy cut flowers, I placed a scrap of paper under the edge of the flowers that I had already attached to my layout. I then colored along the edges with a yellow thick tip marker. The scrap paper allowed me to color without worrying about getting the color on my layout since I had already attached the flowers to it. 

Using a marker with Bo Bunny's Zip-A-Dee-Doodle Collection

Using a marker with Bo Bunny's Zip-A-Dee-Doodle Collection

Here you can see the two techniques together on the layout.

Birthday Wishes Layout detail by Juliana Michaels for Bo Bunny

SUPPLIES | BoBunny
Patterned Paper: Zip-A-Dee-Doodle, Creative and Meow/Zip-A-Dee-Doodle
Combo Stickers: Zip-A-Dee-Doodle
Layered Chipboard: Zip-A-Dee-Doodle
Noteworthy: Zip-A-Dee-Doodle

Other Supplies:
Dylusions Spray Ink in Lemon Zest
Marker: EK Success

Thanks for stopping by today! I hope you enjoyed the tips and techniques that I shared with you and maybe you will find that working with busy patterned papers is more fun than you imagined!

BoBunny Mixed Media Canvas

I promise I had the best of intentions of getting my BoBunny mixed media canvas posted on my blog the same day it went up on the BoBunny blog however, we had just returned from our vacation to Mexico and it didn't happen. I guess it is better late than never, because I noticed several people asking about how I made it.  It is really quite simple and I will walk you through the process below.

I was inspired to finally give this mixed media canvas thing a try after I came across a project created by Arlene on YouTube.  I don't remember how I found her video, but I knew immediately that it was the technique for me to try on my first canvas. This is my very first attempt at creating a mixed media canvas. It is something I have been wanting to try my hand at for quite some time however until I came across the technique that I used, I had always been a little intimidated to try it. The process she shared and that I used was really quite easy and the things I loved most about it were using up some of my leftovers and extra supplies and playing around with my spray inks to create something with a lot of depth, texture and color.

BoBunny Mixed Media Canvas by Juliana Michaels

TECHNIQUE | Mixed Media Techniques
This is a simple technique and I certainly did not create this one as I mentioned above. Arlene has a wonderful video tutorial that I followed to create my canvas. I applied all of the same techniques she mentions, however I did them on a canvas instead of a tag. You can view her video HERE.

INSTRUCTIONS | Mixed Media Canvas
  1. Apply a layer of White Gesso with a paint brush to help prime your canvas and let it dry
  2. Use Matte Medium or another liquid adhesive to adhere lace, fabric, ribbon, doilies, and other flat items to the canvas and let dry.
  3. Lay a stencil or mask on your canvas and apply Modeling Paste using a spatula or other such tool. (an old credit card or gift card works well too). Remove stencil and let Modeling Paste dry.
  4. Arrange flowers, chipboard letters or shapes, trinkets, jewels, paper clips and any other items you wish to use onto the canvas.  Any sort of metal charms or other dimensional embellishments will work well.
  5. Once you have determined where you want to place them, attach them to the canvas using a strong adhesive. I used a hot glue gun.
  6. Using a paint brush, paint everything on the canvas with a coat of White Gesso. Make sure to get into all of the nooks and crannies. Allow this to dry. You may need a second coat if you don't get good coverage with the first coat. (Unfortunately some of the Prima flowers bled when I applied the Gesso to them. I did not have the problem with any of the BoBunny flowers.)
  7. Take your Spray Inks and begin spraying the canvas with your colors. Use a heat gun to dry each color before adding a new color to reduce mixing colors. When you add colors you want to think about what colors you put next to each other because the colors will bleed slightly and mix together with the Dylusions Ink because they are reactive. There is a nice explanation of how to attempt to avoid getting brown when you mix colors HERE if you are interested. A basic understanding of the color wheel and how to mix colors can be helpful during this process. If you are too afraid to try it, then simply go for a monochromatic look and stick with one color or color family such as pinks or blues.
  8. Once dry, apply a coat of Clear Acrylic Matte Coating or Fixative to help protect your canvas. With these particular spray inks the colors will become reactive and bleed if they become wet or moist. Applying the spray coating will help protect the colors or anything your canvas comes into contact with if it should happen to get wet or moist. I highly recommend it!

BoBunny Mixed Media Canvas by Juliana Michaels detail

BoBunny Mixed Media Canvas by Juliana Michaels detail

BoBunny Mixed Media Canvas by Juliana Michaels detail

BoBunny Mixed Media Canvas by Juliana Michaels detail

SUPPLIES | BoBunny
Blossoms: Dahlia, Zinnia
Lace: Buttercup
Trinkets, Jewels: various BoBunny collections

Other supplies:
Spray ink: Dylusions by Ranger in Bubblegum Pink, Postbox Red, Pure Sunshine, Sweetened Orange, Lemon Zest, Fresh Lime, Cut Grass, Vibrant Turquoise, London Blue, Crushed Grape; Heidi Swapp Color Shine in Gold
Canvas: 9 x 12 Canvas
Adhesive: Hot glue gun
Additional flowers: Prima
Stencils: Crafters Workshop
Modeling Paste: Liquetex
White Gesso: Liquitex
Clear Acrylic Matte Coating or Fixative: Hobby Lobby
Chipboard letters and Circle Paper Clips: my stash

I hope you enjoyed my BoBunny mixed media canvas and tutorial! Thanks for stopping by and I would love to see what you create inspired by my canvas!

SRM Stickers Princess Purse

Are you looking for a fun gift or party favor idea? I just might have a fun little idea for you today using the SRM Stickers Clear Purses. When I first saw these Clear Purses I fell in love. I also immediately thought of my niece who loves all things pink and princess and I knew I wanted to make her a little pink princess purse!

INSPIRED BY |  My niece
This time, I was inspired by my niece for the princess theme, so I choose the We've Got Your Sticker - Princess sticker sheet to decorate the container. I was also inspired to use the frog prince sticker because of a scrap of green ribbon that was laying on my scrappy table. Otherwise I might have passed over him and in the end I think the green adds a fun punch of color.

TREND |  Twine and Stencils
Twine is everywhere now, and I love it! I am a huge fan of it and the sheer number of colors that it is available from The Twinery is amazing! I am not much of a ribbon girl, but there is something homey and comfortable about twine that makes me want to use it.
Another fun trend on this project is the use of a stencil and modeling paste. I have been seeing this trend quite a bit lately too where crafters are using stencils with a variety of medium to added a fun mixed media feel to their projects.

SRM Stickers Clear Purse Princess Purse by Juliana Michaels

SRM Stickers Clear Purse Princess Purse by Juliana Michaels

SRM Stickers Clear Purse Princess Purse by Juliana Michaels

TECHNIQUE | Stencils and Modeling Paste
The technique is quite simple here. I placed a Crafters Workshop stencil on the front of the clear purse before I assembled it and it was still flat. I used a bit of removable adhesive to help hold the stencil in place along with my fingers and then I applied a thin layer of Liquitex modeling paste over the top of it with a palette knife. You can also use an old gift card or credit card. I have tried both, but I have found that I prefer the palette knife because it gives me a little more control of the paste. One thing that happened while I was making this is that the modeling paste "leaked" a little under the stencil. Of course this is no problem and I was fine with this look, but you may prefer a more clean design. A different brand or thicker modeling paste may have helped or maybe a stencil that is not so delicate. I am not sure since this is not my area of expertise, but definitely some things to think about. Another thought is to go ahead and let the design carry over onto the sides. I attempted to be careful as I applied the paste because I was trying to only have the design on the front of the purse. I was not entirely successful, so if this is the look you want, I would recommend creating a mask of some sort using masking tape or the like to protect the areas where you don't want the paste. In the end, I think it would have been just fine to have the design on the front and sides.

SRM Stickers Clear Purse Princess Purse by Juliana Michaels

SUPPLIES | SRM Stickers
Stickers: SRM Stickers - We've Got Your Sticker - Princess
Clear Box: SRM Stickers Clear Purse - Small
Twine: The Twinery - Pink Sorbet, Blossom

Other Supplies:
Cardstock: American Crafts
Punches: EK Success
Modeling Paste: Liquitex
Stencil: The Crafters Workshop
Ribbon: unknown

SRM Stickers Clear Purse Princess Purse by Juliana Michaels

I am so happy you stopped by again today! See you soon!!!

Paper Bakery Sketch Challenge 10

It's time for a new sketch challenge on the Paper Bakery blog. Sketch Challenge 10 is live!!! Here is my latest sketch for Paper Bakery and my take on the it using the August Scrapbook Kit.


Paper Bakery Sketch Challenge 10

I switched it up a bit when I created my layout, by flip flopping the placement of the everything from the original sketch.  Because of the position of my subject in the photos, I felt they looked better and helped draw your eye into the layout by placing them on the right hand side of the page.  I then cut some strips to create the banners from various pieces of patterned paper using the August Scrapbook Kit. I then layered them and my photos onto a large rectangular piece of patterned paper and a piece of cardstock to create the base and background for my layout.

Love This Silly Girl Layout by Juliana Michaels for Paper Bakery using the August Scrapbook Kit

I created part of my title using my Silhouette and my own handwriting which was super fun, and some of my all time favorite letter stickers by Jillibean Soup that also included in the August Kit!

Love This Silly Girl Layout by Juliana Michaels for Paper Bakery using the August Scrapbook Kit

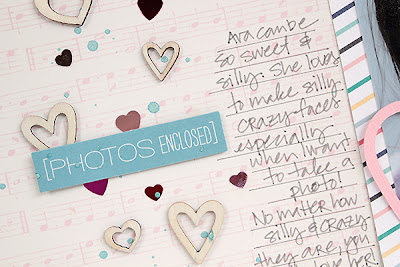
I then created a vertical "border" with the wood veneer hearts from Freckled Fawn and heart confetti that are included in the August Scrapbook Kit! They were so much fun to play with!!!

Love This Silly Girl Layout by Juliana Michaels for Paper Bakery using the August Scrapbook Kit

Carta Bella/ Hello Again; Freckled Fawn/ Wood Veneer; October Afternoon/ Travel Girl; American Crafts/ My Girl; Jillibean Soup/ Alphabeans


Make sure you stop by the Paper Bakery blog for all the details! You have until August 24 to play along for your chance to win a $10 coupon to the Paper Bakery Shop which is full of all kinds of yummies from custom flair to sequins!

I hope you enjoy the new sketch and I can’t wait to see how it inspires you! If you ever have any suggestions about things you would like to see in future sketches, just let me know!

My Favorite Things August Scrap Guest Designer | Part 1

Little did I know a few months back that when I guest designed for Laina Lamb using some of the stamps and dies that she designed for My Favorite Things that I would be asked to guest design for My Favorite Things!!! I was thrilled when I got the email asking me to do so! Of course, I had to use some a combination of dies and stamps designed by Laina since her style really speaks to me! I will be up on their blog twice this month. Today and then again on August 23. The layout I am sharing with you today is about my recent 40th birthday. It was a low key day, but my husband never fails to surprise me. This year he bought me my favorite coffee and then had a surprise birthday party for me at his sisters!

INSPIRED BY | The Products
I have always said that the products I have to play with are what inspire me and that was certainly the case with the dies and stamps from My Favorite Things! I knew immediately upon seeing the Laina Lamb Designs Reel Life die that I wanted to cut it out of different colors of paper and scatter them around on my layout and layer them under my photos.  As I was cutting them, I had the most awesome trash from the negatives that I couldn't bear to throw away. I was then inspired to use these to create the border along the right hand side of the layout. After that I gathered some stamps from the Laina Lamb Designs Right This Way set. I stamped them onto white cardstock using black ink and then fussy cut them before adding them to my layout.

Celebrate Good Times Layout by Juliana Michaels using My Favorite Things Stamps and Dies

TRENDS | Arrows/Triangles
They are still going strong and I love how they can help guide your eye as you look at a layout. I also used them to create a border around the outside edge of my layout with the help of the Laina Lamb Designs Mod Borders set and a gray ink pad.

Celebrate Good Times Layout by Juliana Michaels using My Favorite Things Stamps and Dies

Celebrate Good Times Layout by Juliana Michaels using My Favorite Things Stamps and Dies

SUPPLIES | My Favorite Things
Dies: Laina Lamb Designs/ Accent It - Reel Life; Accent It - Celebrate

Other:
Patterned Paper: Jillibean Soup/ Happy Camper, Soup Staples II and Country Pumpkin Chowder

I hope you enjoyed the layout I created and shared with you today using the fabulous My Favorite Things products! I know I thoroughly enjoyed playing and creating with them!

Pebbles Design Team 2013-2014

I am thrilled and honored to share with you that I am one of the new Pebbles Design Team members!!! I got the email inviting me to join their team as I was waking up one morning. I like to read my emails in the morning on my phone before I get out of bed to help me wake up. Well needless to say, I was awake in 2 seconds flat the morning I got the email inviting me to join the Pebbles Design Team!!! My poor husband was not yet awake and I think I nearly gave him a heart attack with my jumping up and down and screaming!!!


The team is made up of an amazingly talented group of designers. I am looking forward to working with all of them and getting to know all of them better!

Thank you so very much for sharing in my joy and excitement! I can't wait to share my Pebbles projects with you throughout this upcoming year!!!

SRM Sticker Stitches

Today I am sharing a layout I created for SRM Stickers using one of my SRM favorites...Sticker Stitches!  I immediately thought of using them as an alternative to a sewing machine. This is of course, a rather literal take on the idea of the stitches. Nothing new there, but I also had the idea to attempt to create a the look of a patchwork quilt using a combination of different patterns of paper. 

INSPIRED BY | Pocket Page Scrapping
This whole idea of a patchwork quilt was inspired by the ever popular pocket page style layouts. I can't help it, but when I look at them, they remind of a quilt. They are really nothing more than squares and/or rectangles of patterned paper. So, I guess this is my take on a pocket page style layout without the pockets! This could certainly be translated into a pocket design very easily and wouldn't the Sticker Stitches be a fun accent?!

TRENDS | Multiple Patterns
One of the current trends is to incorporate multiple patterns together. This can be seen everywhere from home decor to fashion. It is also becoming quite popular on layouts, with many people attempting to use as many patterns and colors as they can! It is quite fun and by using a set of papers from a collection, the guess work on what will work together becomes much easier.

SRM Stickers Sticker Stitches Together Layout by Juliana Michaels

To create the actual patchwork quilt look, I cut each sticker 1/2" shorter than the width and/or height of each square/rectangle of patterned paper. Then, I adhered each sticker around the outside edge of each piece based on the measurements. I used 9 of the 17 different stitch styles to choose from on each sheet of stickers and overall, I only used two sheets of Sticker Stitches. The only exception was that I had to use one more strip from another sheet of Sticker Stitches in order to be able to make a stitched border long enough to go around the edge of the long orange strip at the bottom of the layout. I also have plenty of stickers left to complete several more projects depending on what I decide to do!

SRM Stickers Sticker Stitches Together Layout by Juliana Michaels

SUPPLIES | Stickers:
SRM Stickers - Sticker Stitches Black

Other Supplies:
Flair: Paper Bakery
Patterned Paper: Lily Bee
Wood Veneer: American Crafts
Cardstock: American Crafts
Digital Cutting File: Howdy Sunshine by Juliana Michaels | 17turtles

SRM Stickers Sticker Stitches Together Layout by Juliana Michaels

I am so happy you stopped by to visit today and I hope you come back again real soon! And if you leave me comment please make sure I have a way to reply back to you! I'd love to visit your blog too!!!

Bo Bunny Design Team Member

I am thrilled and honored to share with you that I have been asked to return as a member of the BoBunny Design Team!!! I still can't believe that I was asked to continue designing for them! I have loved BoBunny for so many years. This is such an amazing company to design for and I feel so very blessed to have been a member of their design team since September 2009. To continue to be able to design for them is truly like a continued dream come true!!!


Along with myself, you will see several returning designers, however, there are 15 new designers joining us. The new BoBunny Design Team is full of amazing talent and a wide variety of styles! And in true BoBunny fashion they have chosen another team from around the world! I encourage you to take a little hop around the world to check them out and to congratulate them!!!

BOBUNNY DESIGN TEAM 2013-2014
Amy Voorthuis - Netherlands
Bernii Miller - Australia
Denise Van Deventer - South Africa
Evgenia Petzer - South Africa
Ilene Tell - Delaware, USA
Irene Tan - Malaysia
Juliana Michaels - Ohio, USA
Kaori Fujimotto - Japan
Keri Babbitt - Utah, USA
Lisa Nazario-Gregory - Florida, USA
Lisa Novogrodski - Rhode Island, USA
Lynn Shokoples - Canada
Maryia Potapovich - Republic of Belarus
Megan Gourlay - New Zealand
Rhonda A. Van Ginkel  - Minnesota, USA
Romy Veul - Netherlands
Solange Marques - Brazil
Tracee Provis  - United Kingdom
Ulrika Wandler - Sweden

Thank you so much for sharing in my excitement and I look forward to continuing to share my love for Bo Bunny with you!!!
Subscribe